White Spots on Tomato Plants: What They Are and How To Treat Them
If your tomato leaves have white spots on them, it may be because of:
- Powdery mildew
- Sun scalding
- Late blight
- Nutrient deficiency
- Bacterial Canker
- Tomato Psyllids
- Whiteflies
- Stink bugs
- Frostbite
- Tomato Leaf Mold
Here’s a quick summary of the various causes of white spots on tomato plants, their effects, and what you should do to stop them.
Don’t worry, we’ll delve into each one later.
| Cause | Effects on Plants | What To Do |
| Powdery mildew | Weakened plantCurling and withering foliagePoor yields and tasteInsufficient photosynthesis | Option #1: Plant-based and horticultural oils. Neem and jojoba oils are one of the most effective organic ways to tackle nearly any kind of fungal infection. Option #2: Mouthwash How To UseMix 1 part ethanol-based mouthwash with 3 parts waterSpray directly onto the infected areas Option #3: Vinegar How To UseMix 4 tablespoons of vinegar with 1 gallon of waterSpray directly onto the infected areas and repeat every 3 days |
| Sun scalding | Burned foliage | Remove the damaged foliage and limit your tomato plant’s sun exposure. If possible, relocate your plant to an area that has limited exposure to harsh sunlight and dry winds. |
| Late blight | Rot the foliage and fruits | If you’ve managed to catch the infection early on, spray your tomato plant immediately with fixed copper fungicide every 7 to 14 days or as the instructions prescribe. Continuously monitor your plant for any signs of improvements. However, once your plant has been severely infected, you have to get rid of the entire thing – the plant and the soil. This is because some strains of late blight can survive on dead plants. |
| Nutrient deficiency | Warping or curling leavesWhite or yellow spots on the leavesPaler colored leavesDroopy or bending stems | Nitrogen Deficiency Option #1: Add well-rotted organic matter into the soil. Option #2: Add a nitrogen-rich fertilizer into your routine. Option #3: Add coffee grounds to your soil. Phosphorus Deficiency Kelp fertilizer is the fastest way to bring back phosphorus into your soil. Sulfur Deficiency Option #1: Add organic matter. Option #2: Add sulfur-rich fertilizer mixes. Magnesium Deficiency Mix about 2 tablespoons of Epsom salt with a gallon of water. Water the soil in replacement of regular watering once a month. Calcium Deficiency Option #1: Add crushed eggshells or shell meal to the soil. Option #2: Use foliar spray of 2% Calcium sulphate. Compacted Roots You’ll need to gently break apart the roots and salvage whatever you can. This may take some time as you need to ensure that you won’t accidentally rip off too much of your plant’s roots. Once you’re done sorting its roots out, repot your tomato plant into a bigger pot to allow its roots to grow and develop freely. Poor watering conditions For consistently wet soil, check if your pot has proper drainage. By this, check whether the water comes out of the pot’s holes properly. If that isn’t the case, reevaluate your watering hours. It’s best to water plants early in the morning before it gets too hot to allow the plant to properly absorb all the water before it evaporates. Meanwhile, for consistently dry soil, it may be a result of insufficient watering. This could be because you’re not watering frequently or deeply enough. As mentioned earlier, water your plants early in the morning before the sunlight becomes too harsh. When doing so, ensure that you’ve completely drenched the soil and that excess water is coming out from the drainage holes. |
| Bacterial Canker | Wilted and curled leavesClogged veinsWhite, yellow, or brown spots on foliageWhite lesions or net-like stripes on fruits | Unfortunately, there are barely any fungicides that can properly address bacterial canker. As a result, many gardeners opt to chuck the entire plant out. However, if you’ve caught the infection early, you can try your luck with spraying a fixed copper foliar spray around the damaged areas. However, it’s not a full-proof fix to getting rid of bacterial canker. |
| Tomato Psyllids | Stunted plant growthWilting, curling, or yellowing leavesPoor fruit production | Option #1: Introduce natural predators. Option #2: Spray spinosad insecticides. Option #3: Spray horticultural oils. |
| Whiteflies | Yellowing shoulderBlotchy ripeningInternal browning | Option #1: Wash them off with water. Option #2: Spray neem oil. Option #3: Hang up sticky yellow fly traps. |
| Stink Bugs | White spots on foliageDamaged fruits | Since they’re fairly large in comparison to other garden pests, you can easily pick them up and dispose of them. Combine soapy water and vinegar and simply drop them into the solution. If you don’t want to pick them up with your bare hands, use gloves. If that doesn’t make things any easier for you, scoop them up with a water or soda bottle instead. Afterwards, you can either throw the bugs away or add them to your compost pile. |
| Frostbite | White or brown spots on the foliageWilted and soggy foliageLesser and poorer fruit productionStunted growthPoor root development | If your tomato plant has frostbite, the only way to get rid of it is to warm up your plant. You can do so by bringing it inside and wrapping it in old thick blankets, towels, and the like. |
| Tomato Leaf Mold | Curled and wilted foliageRotting fruit | Prune the infected leaves. Then, you can spray any kind of readily available fungicide in the market that include the following ingredients:MancozebMandipropamid + difenoconazoleCymoxanil + famoxadone Move your tomato plant to a more well-ventilated area with low humidity levels, which is less favorable to the growth of the pathogen. |
1. Powdery Mildew
What is powdery mildew?
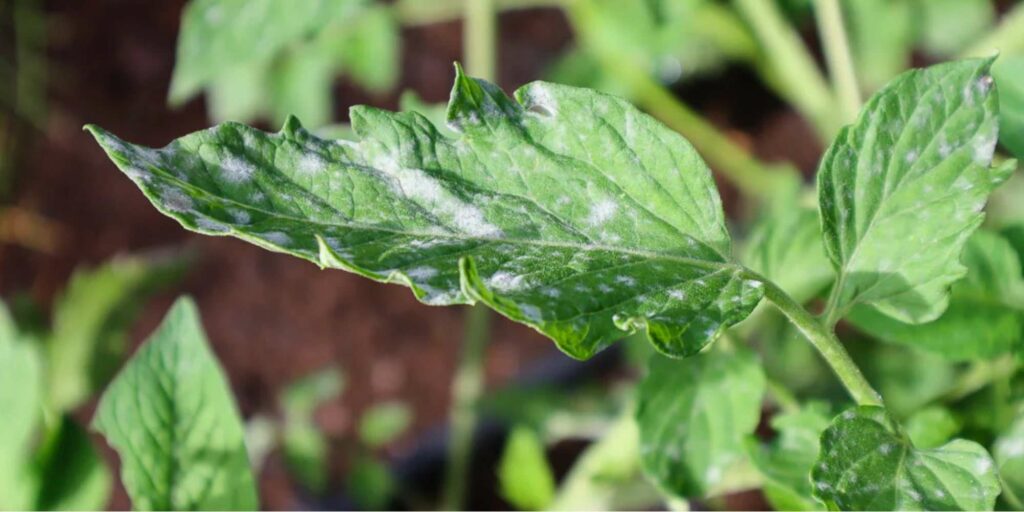
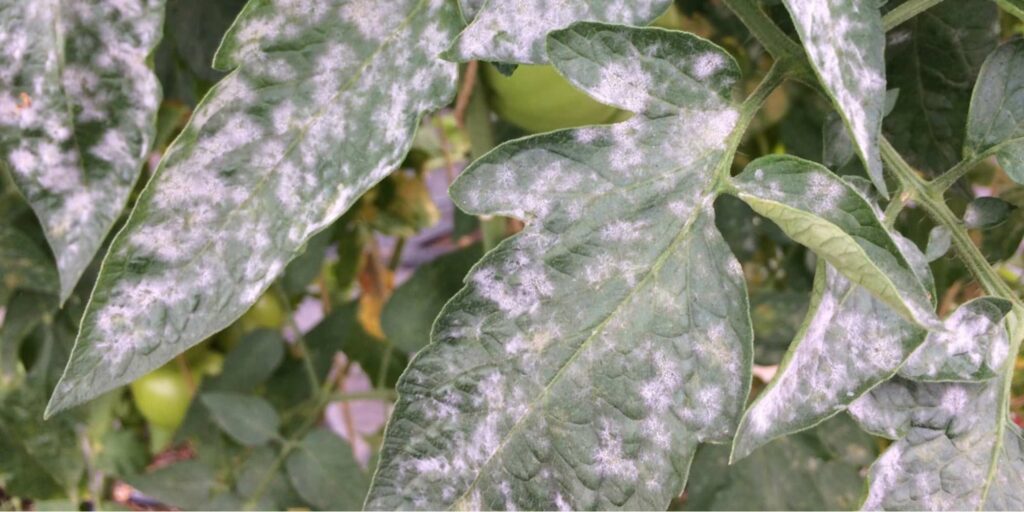
Just as its name suggests, powdery mildew is a white dust-like fungus that is the result of fungal reproduction.
They usually begin appearing on the underside of leaves before making their way to the top. You’ll often spot them on entire leaves’ surface, flowers, stems, and sometimes fruits.
Though rarely fatal, powdery mildew causes a ton of stress on tomato plants because it takes all the nutrients away. This causes the plant to weaken, making it susceptible to diseases and producing poor yields.
What causes powdery mildew?
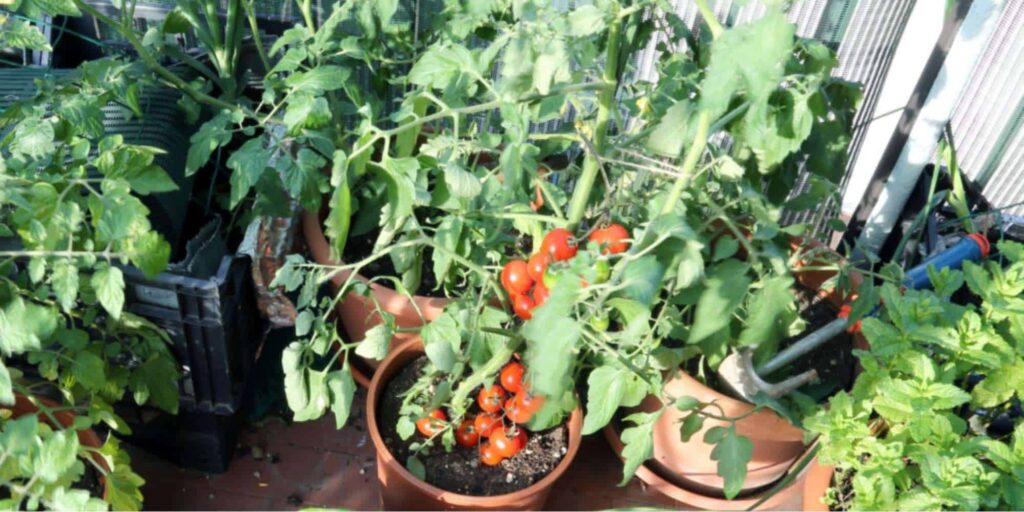
Since powdery mildew is a type of fungi, they thrive in conditions that have the following:
1. Poor ventilation
Powdery mildew thrives in areas with poor ventilation. Hence, they’re often spotted in indoor gardens and greenhouses. Since there’s no new air coming in, airborne spores are brought into the room and grow there.
To promote air circulation, you shouldn’t overcrowd your garden. Your plants should be at least 18 to 24 inches apart to reduce the likelihood of easily spreading diseases and pests.
2. Humid and moist areas
Did you know that powdery mildew doesn’t need rain to germinate, unlike other fungi?
With that said, they thrive in both high and low humidity leveled areas. In fact, high humidity areas promote formation while low humidity areas promote dispersal.
While we applaud their strength, their resistance is quite a pain to deal with.
Ensure that your tomato plant gets plenty of sun, about 6 to 8 hours of full sunlight daily. On top of that, avoid watering the foliage.
3. Too much fertilizer
The main reason powdery mildew loves feeding on young tomato plants is because gardeners tend to over-fertilize their seedlings. Essentially, they’re feeding the fungi, too.
As much as we understand your love for your plants to grow healthy and strong, try to avoid going overboard with the fertilizer. Instead, follow the instructions as prescribed.
What are the effects of white spots on tomato plants?
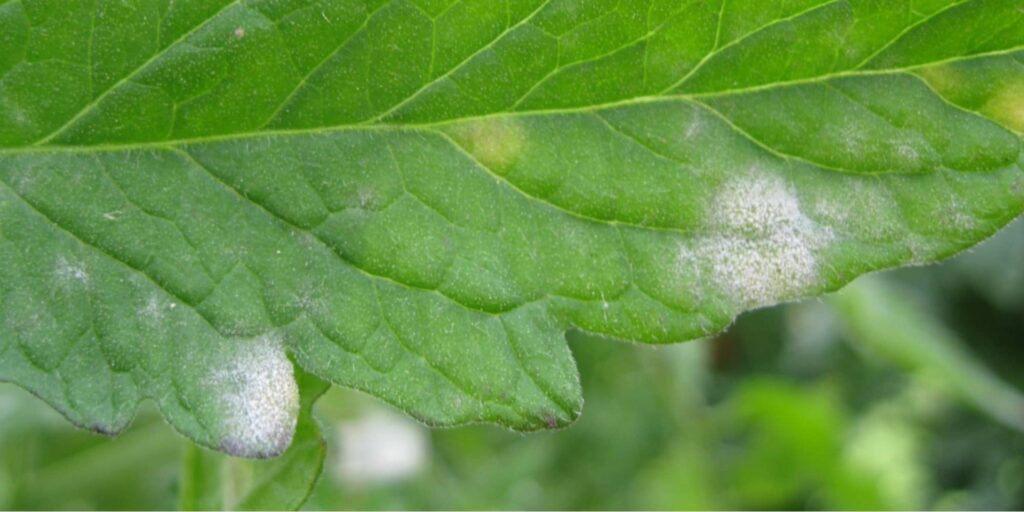
Having powdery mildew on your tomato plants can cause one or more of the following negative effects on your tomato plant:
- Weakened plant
- Curling and withering foliage
- Poor yields and taste
- Insufficient photosynthesis
Thankfully, powdery mildew will rarely ever kill your tomato plant. However, it will suck all of the nutrients away.
As a result, your tomato plant will become weaker and more vulnerable to catching diseases. You’ll notice your leaves curling and withering because of this.
Apart from that, powdery mildew will negatively affect your tomato plant’s photosynthesis and growth. The lack of sugar produced can result in reduced yields and poor-tasting fruit.
How do I treat powdery mildew?
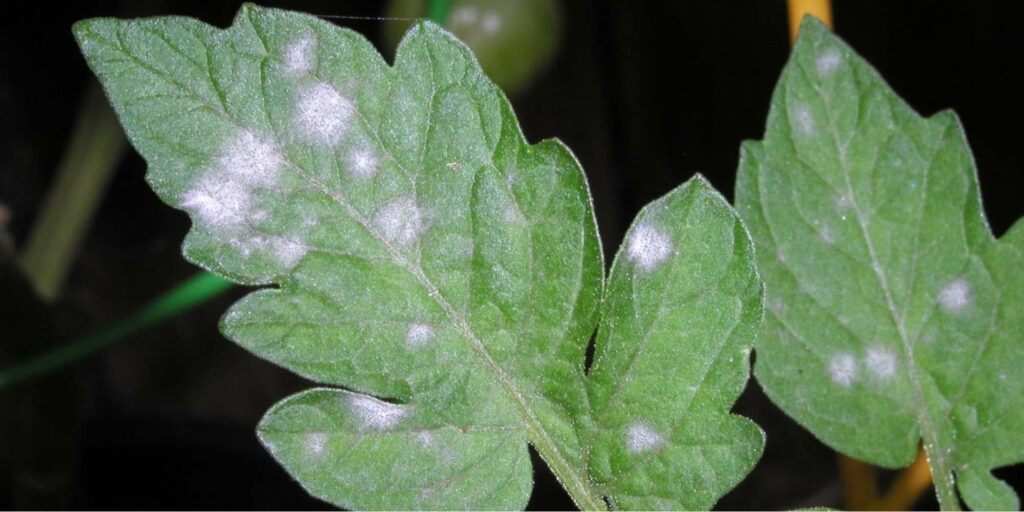
1. Prune
Once you’ve noticed that your plant has been infected with powdery mildew, you’ll need to prune all the infected areas.
Doing so will also prevent the powdery mildew from spreading onto your other nearby plants. Apart from that, you’ll need to prune healthy foliage, too, in order to promote airflow.
However, don’t prune too much healthy foliage away as you may disrupt your tomato plant’s photosynthesis.
Planter’s Tip: Don’t forget to sanitize your pruning tools before and after each use to avoid cross-contamination. When it comes to disposing of the infected leaves, burn them instead of simply throwing them away.
2. Spray fungicide
There are several different fungicides available in the market for tackling powdery mildew. Apart from that, there are several homemade options, too.
Option #1: Plant-based and horticultural oils.
Neem and jojoba oils are one of the most effective organic ways to tackle nearly any kind of fungal infection.
To boot, they’re non-toxic, which makes it safe to use indoors around young children and pets.
Unfortunately, they only work for light to moderate powdery mildew infestations.
Option #2: Mouthwash
Apart from the cleaning properties mouthwash can do for one’s dental hygiene, mouthwash is also great for getting rid of powdery mildew.
How To Use
- Mix 1 part ethanol-based mouthwash with 3 parts water
- Spray directly onto the infected areas
Option #3: Vinegar
Vinegar is another popular household lifesaver when it comes to getting rid of garden pests. However, it’s highly acidic so you should use it in moderation to avoid harming your plants.
How To Use
- Mix 4 tablespoons of vinegar with 1 gallon of water
- Spray directly onto the infected areas and repeat every 3 days
How do I prevent powdery mildew from entering my garden?
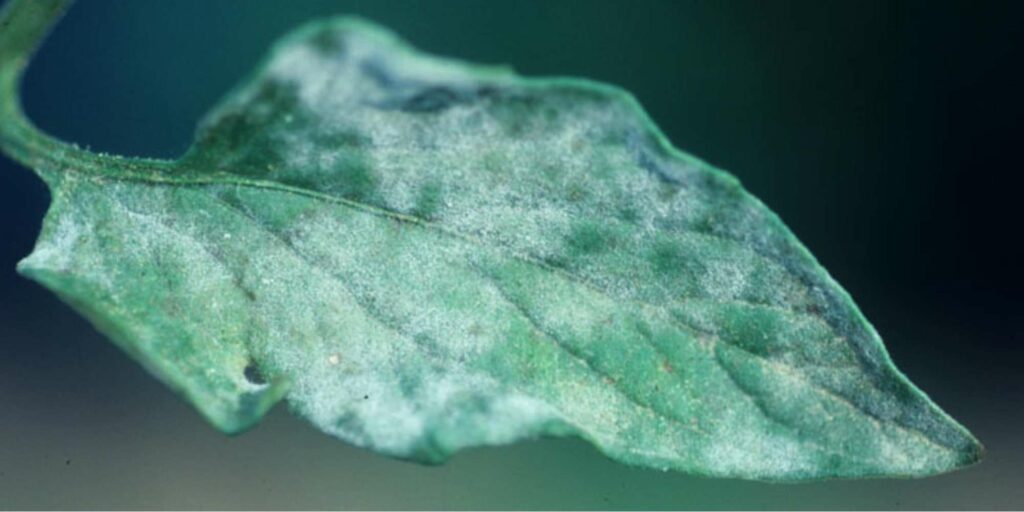
Unfortunately, there aren’t any full-proof preventative measures that you can take to completely eliminate the powdery mildew.
Nonetheless, there are a couple of tricks that you can do to prevent the likelihood of getting powdery mildew in your garden.
1. Ensure that there’s proper air circulation in your garden
It’s a good rule of thumb to keep plants at least 18 to 24 inches away from one of another.
Aside from giving them enough room to grow freely, this also ensures that they’re less likely to easily catch other plants’ diseases and pests.
2. Give your tomato plants around 6 to 8 hours of full sunlight and avoid moisture
Powdery mildew loves areas that are damp and dark. In fact, an area conducive to the growth of powdery mildew isn’t ideal for growing healthy tomato plants.
In case you didn’t know, tomato plants absolutely love the sun. In fact, they need around 6 to 8 hours of full sunlight.
When watering your plant, do so in the early mornings so that your plant has enough time to properly absorb all the water. This also prevents moisture from lasting through the night.
3. Regularly prune your tomato plants
Pruning also works as a preventative tactic because you’re increasing air circulation by removing excess foliage.
As a tomato gardener, you’d know full well how quickly tomatoes can overgrow the area you’ve set up for them. Too many crowded leaves can result in poor circulation.
Because of this, it’s a great habit to prune your tomato plants every now and then. However, be careful to not prune too much as your plant will still need leaves to do photosynthesis.
2. Sun scalding
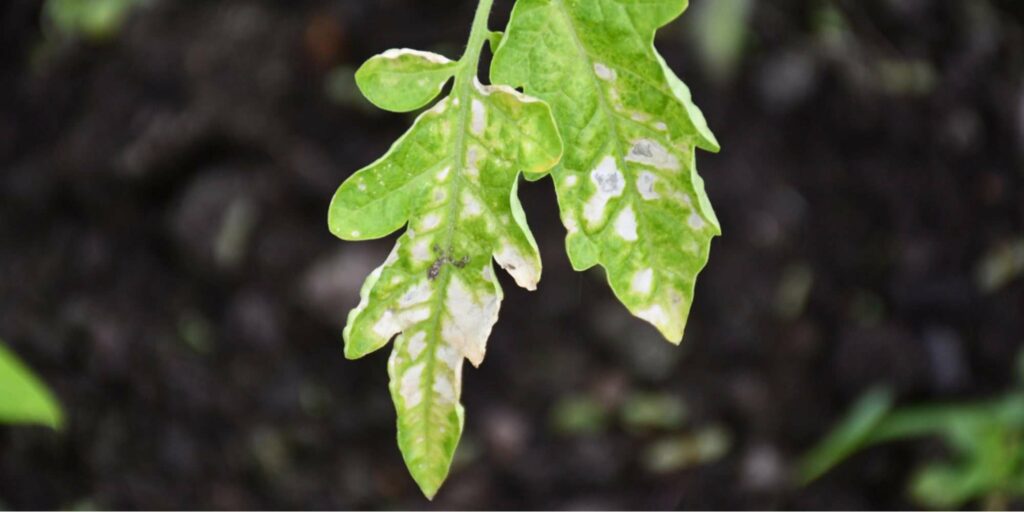
What is sun scalding?
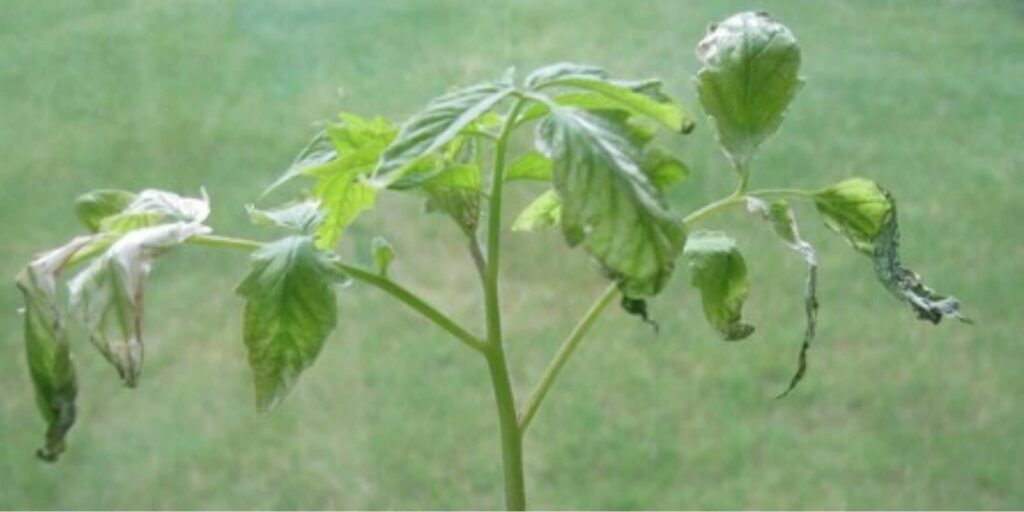
As its name suggests, sun scalding is when your tomato plant’s foliage has been exposed to high temperatures for too long. As a result, it endured heat damage that has caused the leaves to develop white blotches.
What causes sun scalding?
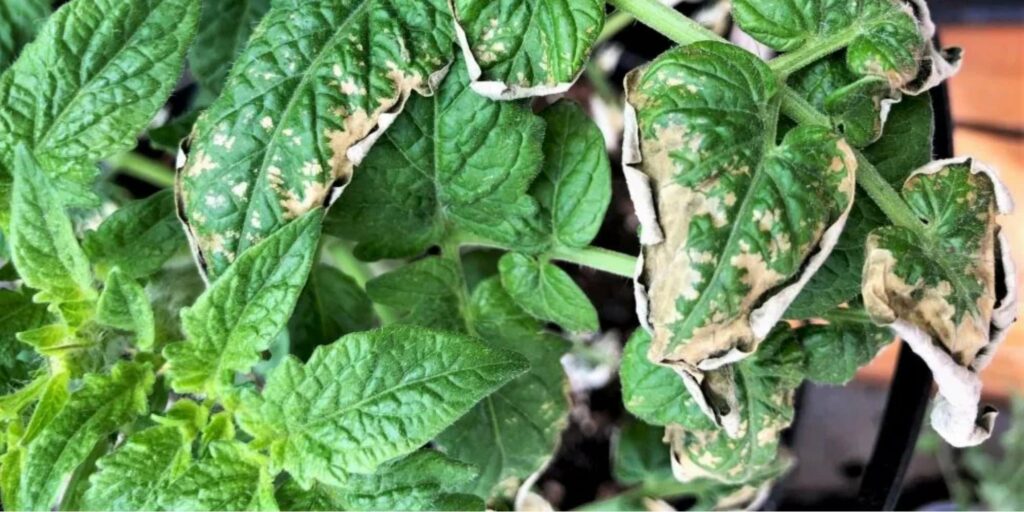
Sun scalding is caused when your tomato plant has been exposed to high temperatures for too long, which causes heat damage on the foliage.
This typically happens when indoor tomato plants receive too much exposure to sunlight too soon because the plant wasn’t given enough time to acclimate.
The sudden shock to bright sunlight can cause white burn spots on the leaves, which will eventually turn brown.
What are the effects of sun scalding?
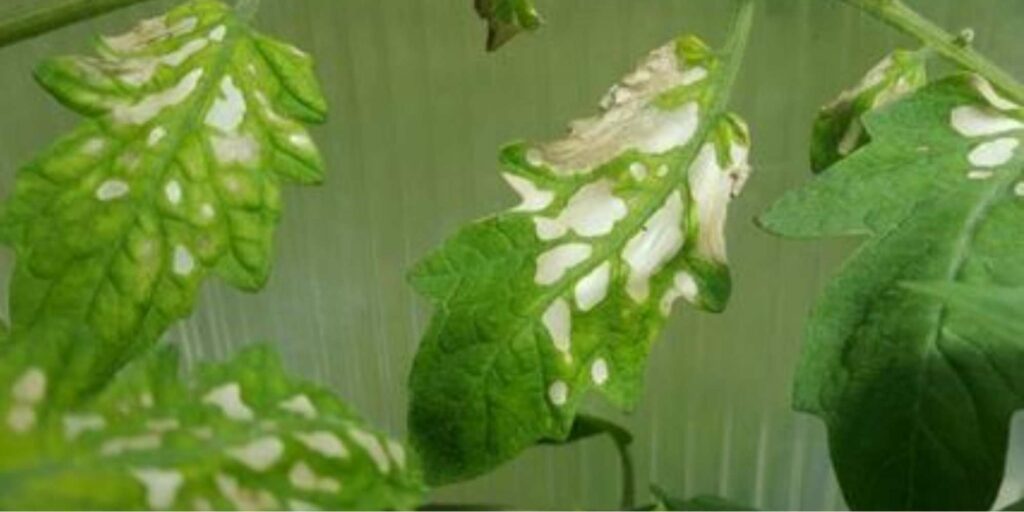
If no intervention is done, sun scalding will cause the affected foliage to dry out and eventually fall off. Without any leaves, this will compromise your tomato plant’s overall health.
If your tomato plant doesn’t have any leaves, it won’t be able to grow properly. Too much heat will also hinder their fruit production as the plant will focus all its energy on surviving.
How do I treat sun scalding?
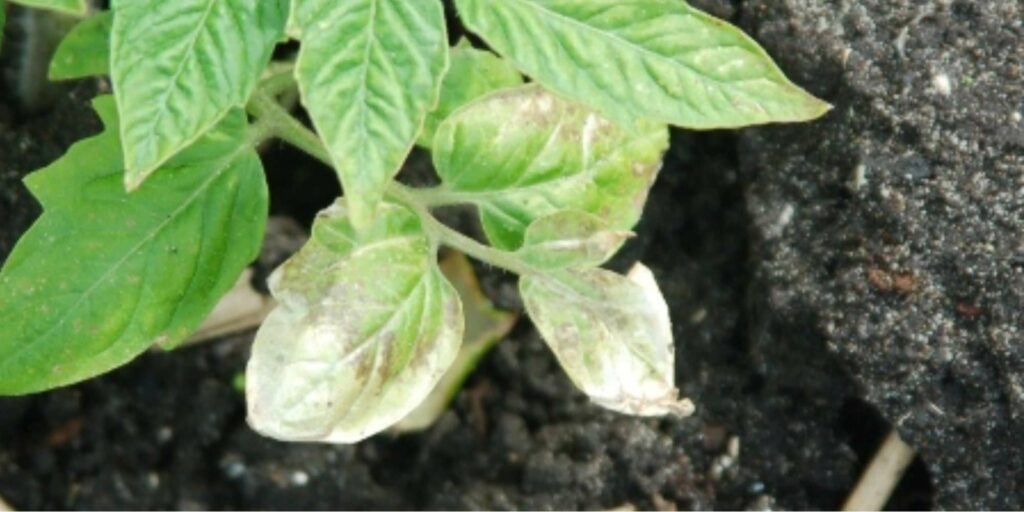
The first thing that you’ll need to do is to remove the damaged foliage. This way, your plant isn’t susceptible to diseases and it can focus all its energy on staying healthy.
You should also immediately limit your tomato plant’s sun exposure. If possible, relocate your plant to an area that has limited exposure to harsh sunlight and dry winds.
Fortunately, plants often recover after sun scalding. So you don’t have to worry too much.
How do I prevent sun scalding?
For transferring indoor plants outdoors
Gradually acclimate your indoor tomato plant’s sun exposure, which is called “hardening off”. To do so, let your plant sit in the shade for a few hours each day.
Don’t forget to pay attention to any signs of heat damage such as curling leaves or a droopy stem.
If everything looks good, take the acclimation process a bit further by taking your plant outside during cloudy days.
For outdoor plants
If your outdoor plant is experiencing heat damage, move it to a well-protected and shaded area. However, if that’s not possible, you can install shade yourself via cloth.
As your plant continues to grow, you can begin hardening off by gradually increasing its exposure to sunlight.
As always, keep a close eye for any signs of damage.
3. Late blight
What is late blight?
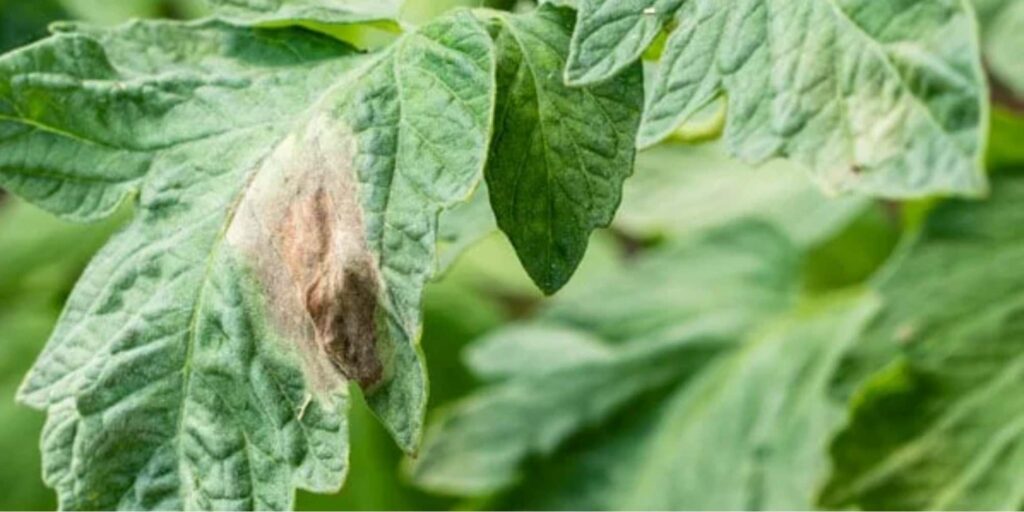
Late blight is one of the most serious fungal diseases that affects tomatoes. Since the spores of late blight are airborne, it spreads rapidly during the cold and rainy seasons.
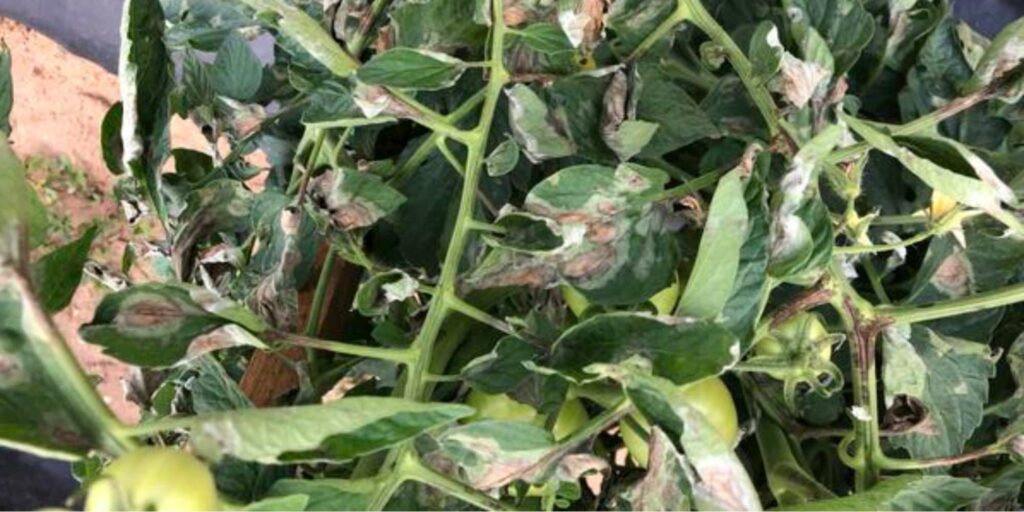
Infected plants will have white powder-like spots on its leaves and some rotting by the stem.
Because of how severe it attacks, it’s very unlikely that plants make it out alive. Since it’s a fungal infection, gardeners don’t have any other choice but to get rid of the plant to avoid spreading the disease.
What causes late blight?
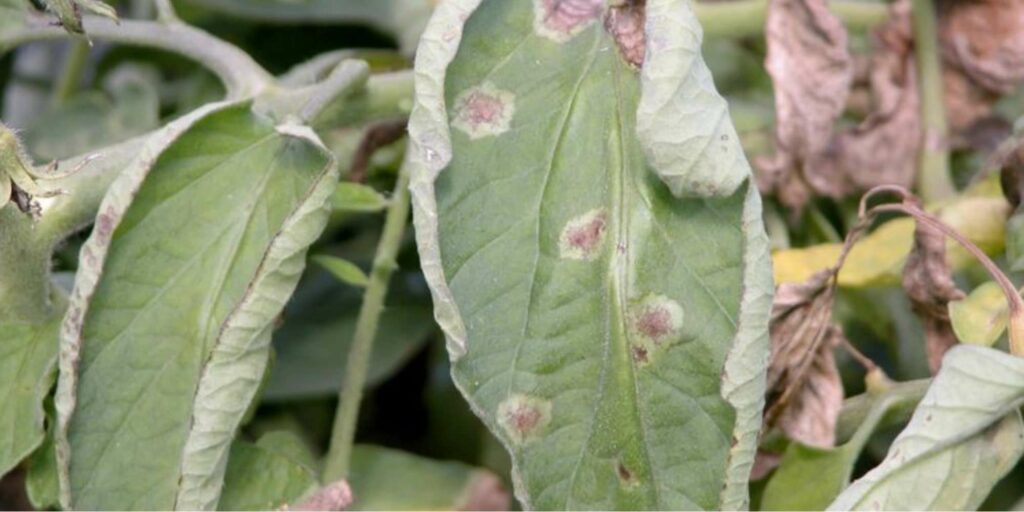
Late blight is a fungus that thrives in wet, cool weather. Hence, they’re typically more prevalent during the cold and rainy months.
However, once your plant gets infected, there’s very little that you can do to save it. So, the next best course of action would be to ensure that preventive measures are enforced.
What are the effects of late blight on my tomato plants?
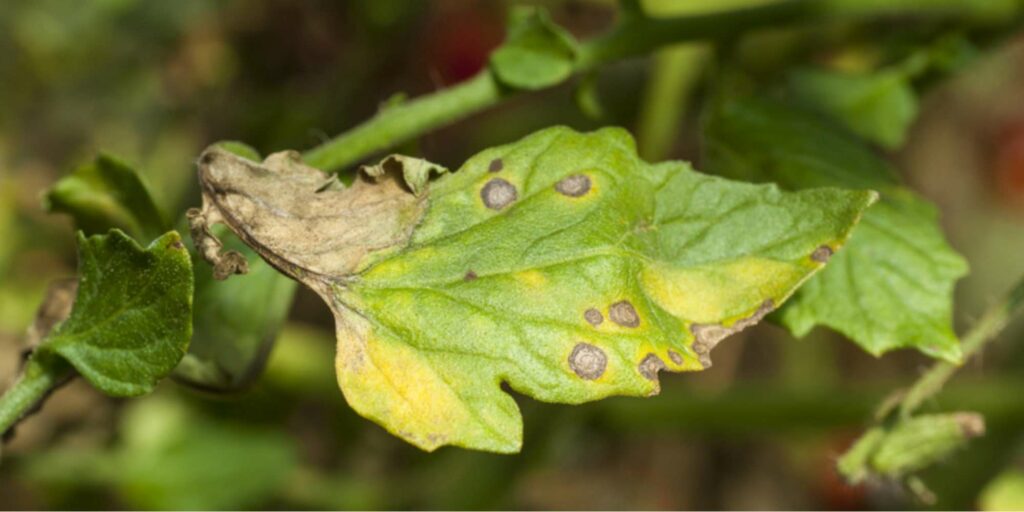
As one of the most serious types of fungal diseases that can affect tomatoes, late blight can wreak havoc on both the foliage and fruits of your plant.
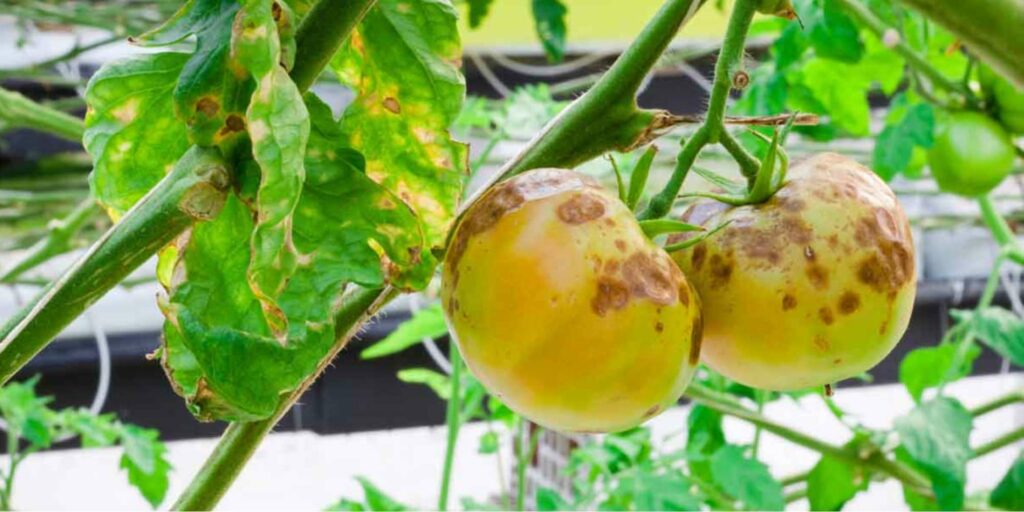
The leaves will have white powder-like spots which will eventually turn brown. As for the stem, it’ll also develop brown spots and will appear to be rotten.
As for the fruits, they’ll develop soft lesions, typically on the top part of the fruit, and appear rotten as well.
How do I treat late blight?
How To Treat
Unfortunately, you can only treat late blight if you’ve spotted the infection early.
If you’ve managed to catch the infection early on, spray your tomato plant immediately with fixed copper fungicide every 7 to 14 days or as the instructions prescribe.
Continuously monitor your plant for any signs of improvements.
However, once your plant has been severely infected, you have to get rid of the entire thing – the plant and the soil. This is because some strains of late blight can survive on dead plants.
Having said that, the best way to get rid of an infested tomato plant is to burn it. You also need to dispose of the soil as it can be a carrier of the fungus.
How do I prevent late blight?
Since late blight is a fungus, the kind of environment that it thrives on is similar to powdery mildew.
To prevent late blight from recurring:
1. Ensure there’s a substantial distance between your plants.
When your plants are too close together, there isn’t enough air circulation. This makes it easier for pests and diseases to get around your garden.
A good rule of thumb to follow is to space your plants at around 18 to 24 inches away from one another.
It’s also a good practice to prune your plant every now and then. This way, air can get around quicker.
Planter’s Tip: Thoroughly clean your equipment before and after use to ensure that you don’t unknowingly transfer the fungi to the rest of your garden.
2. Avoid leaving your plants wet for long periods of time.
Since fungi love moist and wet environments, it’s best to water your plant early in the morning.
Avoid watering in the middle of the afternoon or when the sun is at its hottest because the water you give your plants will evaporate before your plant has the time to absorb it.
Don’t water in the evenings either because there isn’t enough sunlight to ensure that your plant and the ground is dry before nightfall.
3. Spray fungicides
Spraying fungicides is another great way to prevent late blight from coming back. For most gardeners, they prefer
- Chlorothalonil
- Mancozeb
- Fixed copper
As for application, spray once every 10 to 14 days and only 4 times annually. This is a good amount to ensure that your plants are protected.
If you spray too much fungicide too frequently this could result in killing the good microbes. It’s important to keep in mind that you should never spray fungicides on hot days.
4. Nutrient Deficiency
What is nutrient deficiency?
Nutrient deficiency is just that – deficiency in nutrients. In a nutshell, it’s when your plants don’t get enough of the good stuff.
Depending on the results of your soil test, your plant could need an extra boost of nitrogen, sulfur, or phosphorus.
What causes nutrient deficiency?
The most common cause of nutrient deficiency is if your plant has poor growing conditions. This can manifest because of the following:
The soil has an imbalanced pH level
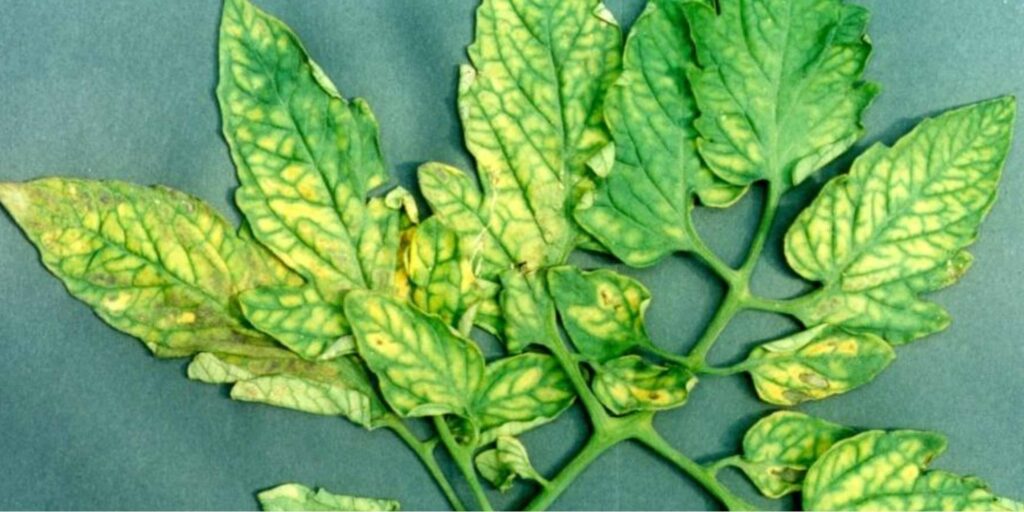
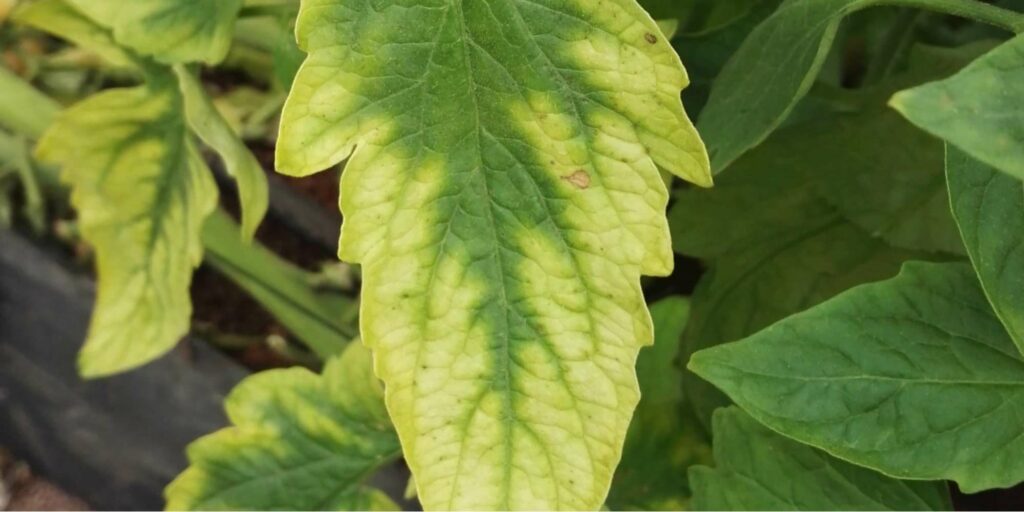
Because of this, your plant is exerting more effort to absorb the nutrients in the soil. As a result, your plant will show you signs that it isn’t doing all right, from white or yellow spots on its leaves to droopy stems.
Compacted roots
Compacted roots are the result of poor soil structure and insufficient space. As a result, the soil becomes too hard and stuck together that your plant’s roots have nowhere to go.
Poor watering conditions
Your plant can have a difficult time absorbing nutrients if the soil is too wet or dry. If your soil has seen extended periods of dry or wet conditions, this can impact the amount of nutrients it has.
What are the effects of nutrient deficiency?
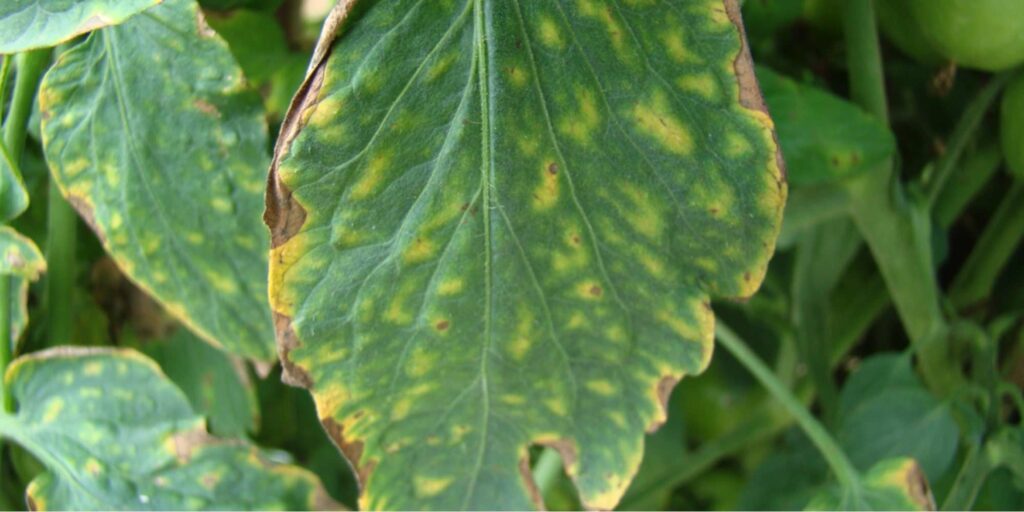
While the effects can slightly differ depending on the kind of nutrients your plant lacks, most tomato plants that experience nutrient deficiency show signs of:
- Warping or curling leaves
- White or yellow spots on the leaves
- Paler colored leaves
- Droopy or bending stems
- Stunted growth
In more severe cases, leaves simply fall off from the plant.
How do I treat nutrient deficiency?
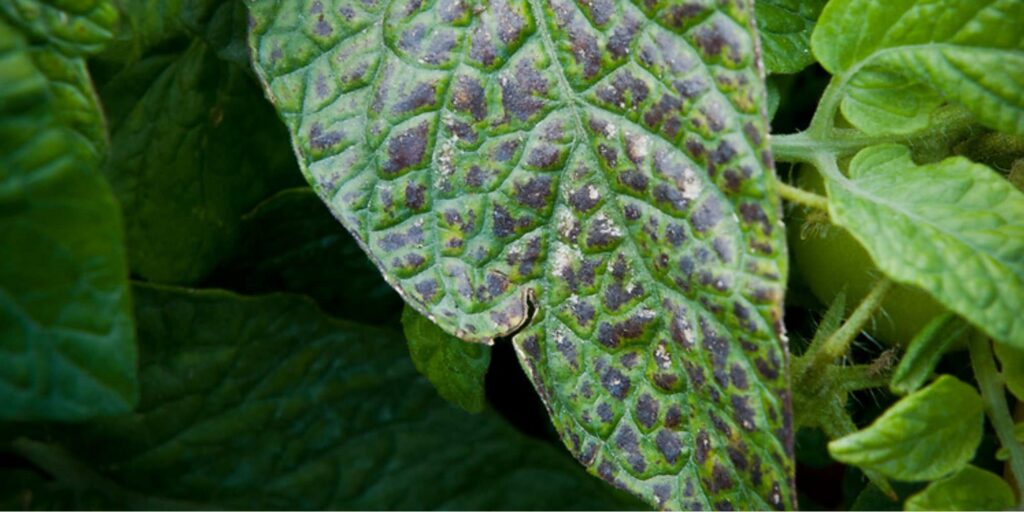
Your approach to treatment will vary depending on the kind of nutrients that your plant needs. Apart from assessing the visual symptoms of your plant, you’ll also need to assess the soil.
The soil has an imbalanced pH level
To identify what kind of nutrients your soil needs, you’ll need to perform a soil test. There are a ton of soil test kits available in the market and online.
However, some require more professional gear to determine the components of your soil.
| Type of Deficiency | What To Do | Type of Test |
| Nitrogen | Option #1: Add well-rotted organic matter into the soil. The organic matter will naturally release nitrogen into the soil, which your tomato plant will easily be able to absorb. Option #2: Add a nitrogen-rich fertilizer into your routine. One of the quickest ways to add nitrogen to your plant’s soil is through a nitrogen-rich fertilizer. Repeat once every 2 weeks until you’ve seen signs of improvements. Option #3: Add coffee grounds to your soil. What’s great about coffee grounds is that they’re rich in nitrogen, but aren’t acidic. This makes them safe to add to your garden care routine. Simply sprinkle the grounds into the soil. About 1-2 scoops weekly should be enough for a large pot. | Kjeldahl method |
| Phosphorous | Kelp fertilizer is the fastest way to bring back phosphorus into your soil. | Soil pH testBray testsMehlich 3 |
| Sulfur | Option #1: Add organic matter. If you want to add sulfur to your soil naturally, organic matter is your best option. Simply dig a deep hole and bury well-rotted compost about 1 to 2 inches deep. Your tomato plant will then be able to easily absorb the sulfur from the soil. Option #2: Add sulfur-rich fertilizer mixes. Another quick way to add sulfur is to sprinkle sulfur-rich fertilizer mixes. About ½ cup’s worth for each tomato plant. Alternatively, you can follow the prescribed dosage on the packet. | Sulfate-sulfur soil test |
| Magnesium | Epsom salt is rich in magnesium, which is why it’s nearly every gardener’s go-to solution for magnesium-deficient plants. To use, mix about 2 tablespoons of Epsom salt with a gallon of water. Water the soil in replacement of regular watering once a month. | Soil pH test |
| Calcium | Option #1: Add crushed eggshells or shell meal to the soil. One of the most popular ways to naturally add calcium is to crush up some eggshells or shell meal and add them directly to your soil. Mix these about 6 to 8 inches deep to ensure that your tomato plant can properly absorb the nutrients. Option #2: Use foliar spray of 2% Calcium sulphate. Foliar calcium sprays are a more effective way to treat calcium deficiency as your plant can absorb the nutrients faster through its leaves than its roots. To use, spray your plant’s foliage around twice a week. | LAQUAtwin Ca2+ meter |
Compacted roots
The only way to tell if your plant has compacted roots is to take the entire plant out of the pot. If the roots are looped and tied together tightly, that means your roots have been compacted.
To address this, you’ll need to gently break apart the roots and salvage whatever you can. This may take some time as you need to ensure that you won’t accidentally rip off too much of your plant’s roots.
Once you’re done sorting its roots out, repot your tomato plant into a bigger pot to allow its roots to grow and develop freely.
Poor watering conditions
If you’ve noticed that your soil has been excessively dry or wet for a long period of time, then it’s about time that you investigate the cause.
For consistently wet soil, check if your pot has proper drainage. By this, check whether the water comes out of the pot’s holes properly.
If that isn’t the case, reevaluate your watering hours. It’s best to water plants early in the morning before it gets too hot to allow the plant to properly absorb all the water before it evaporates.
Meanwhile, for consistently dry soil, it may be a result of insufficient watering. This could be because you’re not watering frequently or deeply enough.
As mentioned earlier, water your plants early in the morning before the sunlight becomes too harsh. When doing so, ensure that you’ve completely drenched the soil and that excess water is coming out from the drainage holes.
How do I prevent nutrient deficiency?
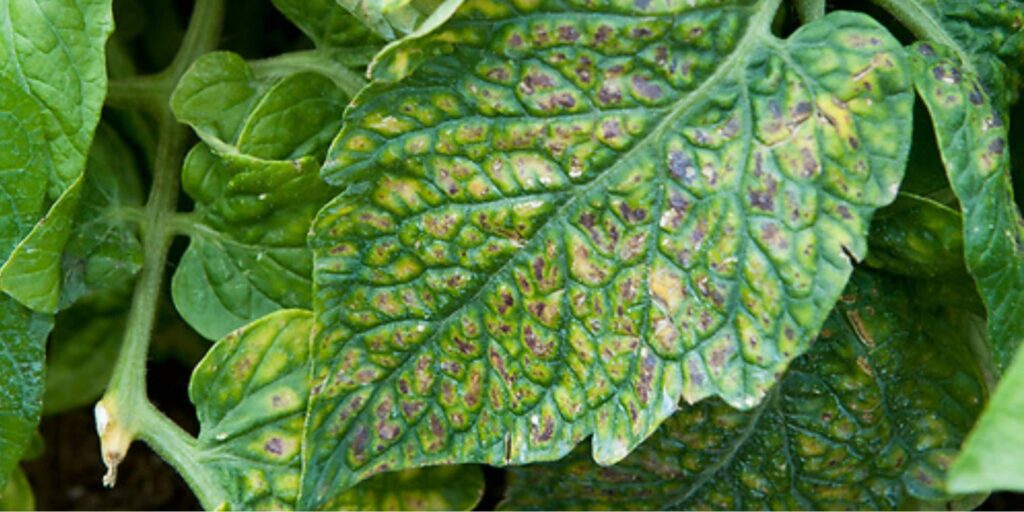
The best way to prevent nutrient deficiency in your plants is to provide your plant with a well-balanced fertilizer routine.
Here are a couple of things to consider when looking for a fertilizer:
Nutrient Levels
Planter’s Tip: Did you know that fertilizers are assessed through their NPK levels? Nitrogen (N), phosphorus (P), and potassium (K) are fertilizer’s 3 main nutrients.
If your plant is doing just fine but you want to add a little extra nutrition, opt for a fertilizer with a NPK level ration of 10-10-10.
For a healthy plant with great yields, you’ll want to ensure that your plant has a ton of micronutrients to intake.
On the other hand, if you’re trying to fix a specific deficiency, then it’s best to look for a specialized fertilizer. Say, if your plant is lacking some nitrogen then you should pick up a fertilizer that’s rich in that.
However, be careful when distributing as you might overdo it. This could actually result in more harm than good.
Having said that, read the instructions properly and only give the prescribed dosage.
Medium
Fertilizers come in all sorts of forms such as liquids and powders. Even so, the medium isn’t that big of a deal when it comes to how well your plant can absorb it.
What’s important to take note of is that you’re following the directions for use. As mentioned earlier, don’t skip reading the instructions!
Some fertilizers require dilution or have strictly prescribed methods for use. For example, some work best misted onto the foliage while others are better when watered onto the soil.
Form
Like every other thing, fertilizers come in two forms – organic and inorganic.
| Organic | Inorganic | |
| Composition | Natural | Synthetic |
| Absorption Rate | Regular | Fast |
Organic fertilizers come from naturally released nutrients, which is most often from well-rotted organic matter. This could be eggshells, fruits, leaves, and so on.
Meanwhile, inorganic fertilizers, as its name suggests, are “man made” or chemically manufactured. So, while their nutrient composition is complete.
The reason why many gardeners prefer organic fertilizers is because on top of its natural composition, it allows the plant to slowly absorb the nutrients.
By letting the plant take in the nutrients at its own pace, the likelihood of inducing stress or incurring fertilizer burns are minimal to none.
Apart from that, the use of too much inorganic fertilizers is terrible for human health. Studies have revealed links between excessive synthetic fertilizers and some diseases.
5. Bacterial Canker
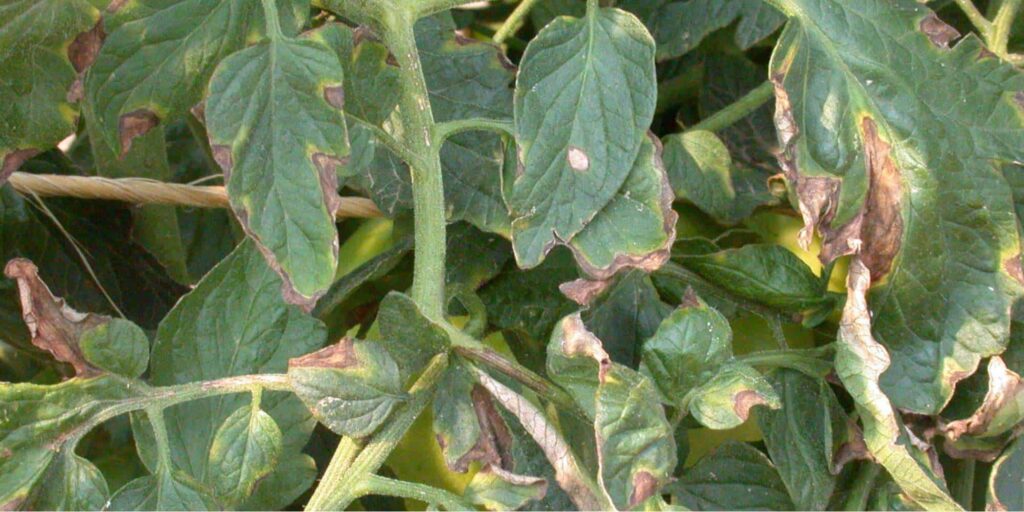
What is a bacterial canker?
Bacterial canker is a disease caused by a bacterial pathogen, which is typically seedborne.
Hence, it’s easily transmissible during transplant productions, through water droplets, or even infected gardening equipment such as tools or gloves.
What causes bacterial canker?
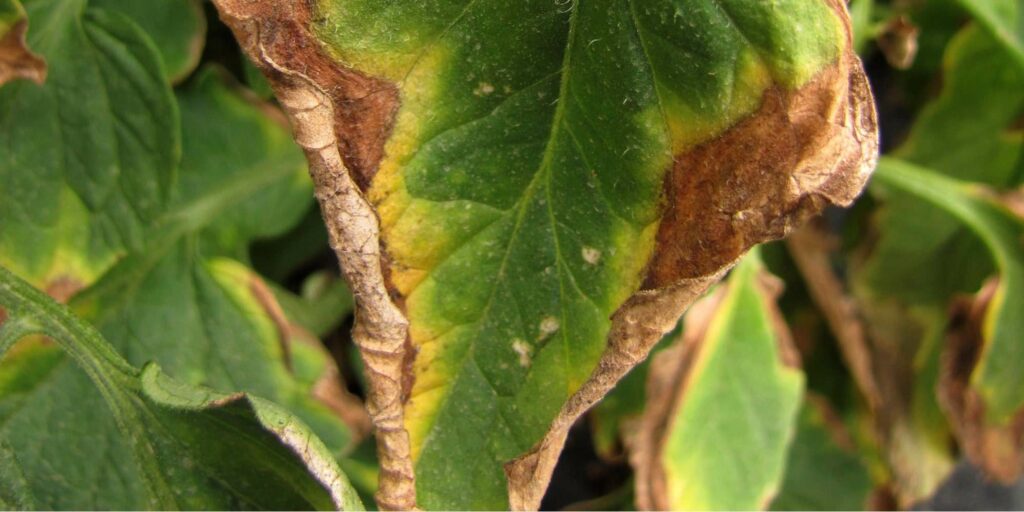
Bacterial canker is caused when the pathogen makes its way into your garden. This could be through the following infected:
- Seeds
- Plants
- Water
- Gardening equipment
- Debris
Planter’s Tip: The pathogen from bacterial canker can survive in dead plants for about 2 to 3 years. Hence, to ensure that it doesn’t make its way back into your garden for good, it’s best to burn infected plants.
What are the effects of bacterial canker?
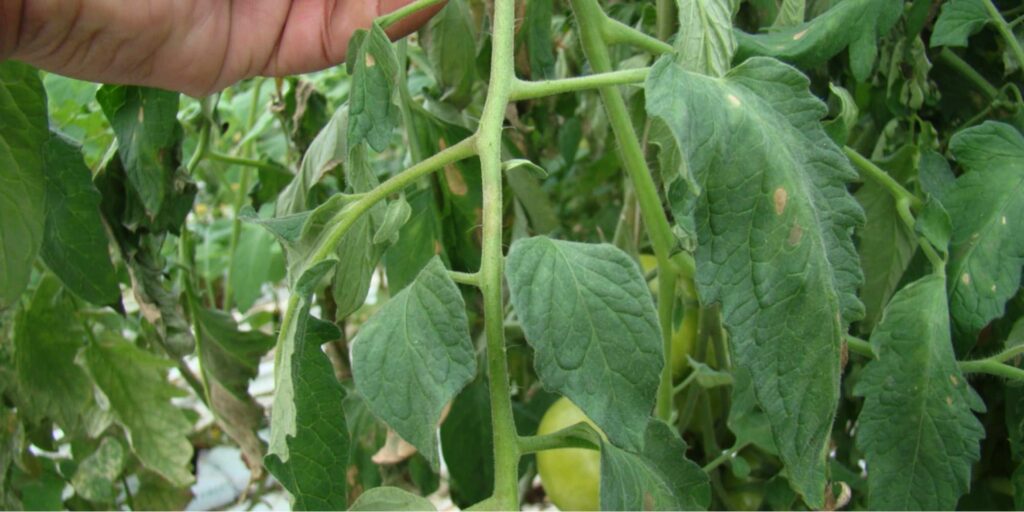
As one of the most destructive types of diseases in tomato plants, bacterial canker is no joke.
The bacterial pathogen, Clavibacter michiganensis subspecies michiganensis, clogs the veins of your tomato plant. Because of this, leaves begin to wilt and curl as access to nutrients gets blocked.
The bacteria appears as white, yellow, or brown spots on the leaves and stems of an infected tomato plant.
Apart from killing the foliage, they go after the fruits, too. They leave small white lesions or net-like white stripes on the fruit.
How do I treat bacterial canker?
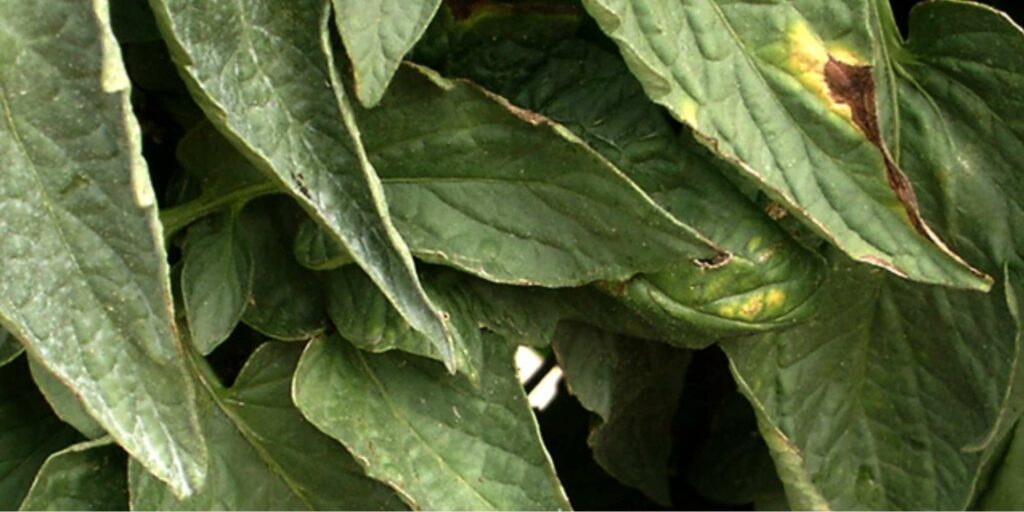
Unfortunately, there are barely any fungicides that can properly address bacterial canker. As a result, many gardeners opt to chuck the entire plant out.
However, if you’ve caught the infection early, you can try your luck with spraying a fixed copper foliar spray around the damaged areas. However, it’s not a full-proof fix to getting rid of bacterial canker.
Having said that, most gardeners opt for preventative measures instead.
How do I prevent bacterial canker?
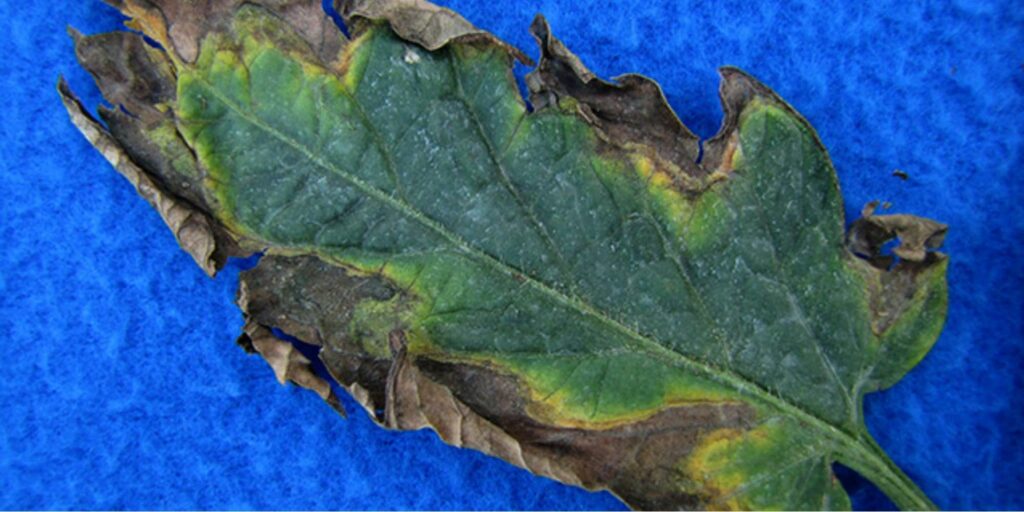
To prevent bacterial canker from taking hold of your garden, here are a couple preventative measures that you can practice:
Regularly sanitize your garden and the equipment you use.
It’s no surprise that working in the garden gets quite dirty. From dirt to debris, seasoned gardeners are well-aware that the likelihood of maintaining a spiffy garden is quite tricky.
Even so, it’s a good practice to regularly sanitize your garden. This includes wiping down trellises, fences, benches, floors, and the like with disinfectants, especially when transplanting.
To make a cleaning solution, mix about 1 part bleach (or other chemical disinfectants) with 9 parts water.
Water your plants in the morning.
It’s crucial that your gardening schedule is some time in the morning before the sunlight becomes too hot. This is because watering your plants before noon ensures that they get to absorb all the water before it evaporates.
By lunch time, it’s hot enough that the water dries up. This ensures that your soil and foliage aren’t wet and promote fungal or bacterial growth at night.
Purchase your seeds from a reputable supplier.
As straightforward as it sounds, only buy your seeds from suppliers that have all the necessary credentials with a stellar track record.
There are a ton of diseases that can be derived from infected seeds. Once in your garden, the fungi can infect your other plants as well.
6. Tomato Psyllids
What are tomato psyllids?
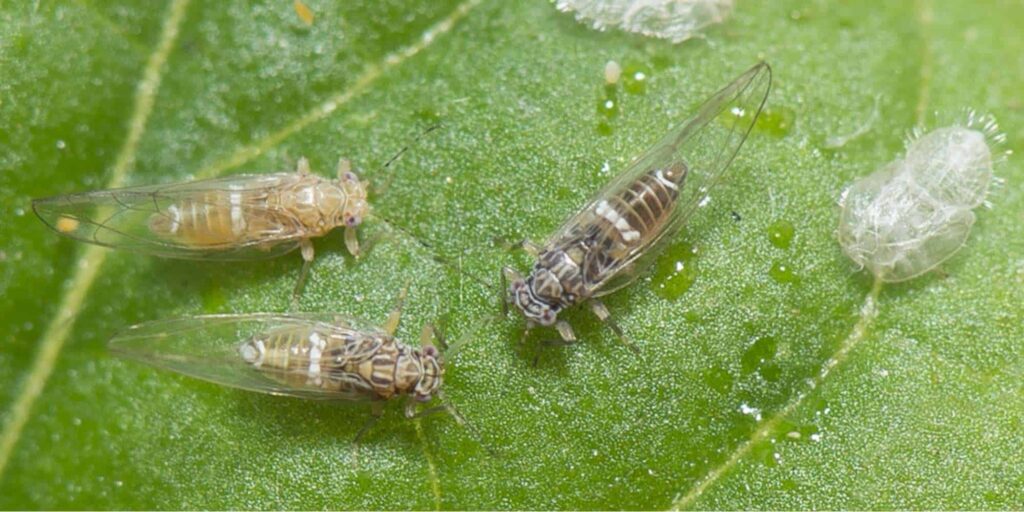
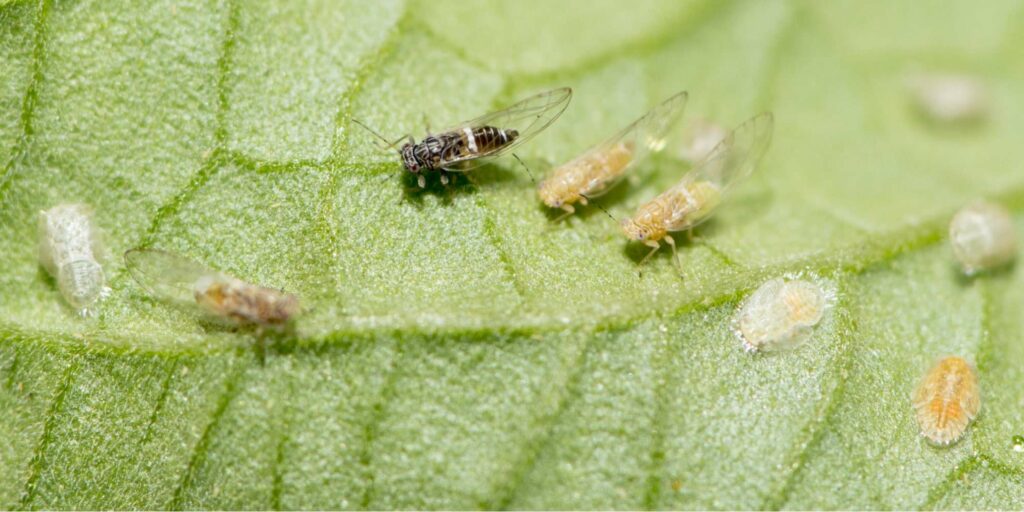
Scientifically referred to as the Bactericera cockerelli, a tomato or potato psyllid is a small white or yellow insect that grows to about 0.12 (or 3mm) long.
They have transparent wings which help them easily transfer from one plant to another. They also have faint white lines across each of their segments.
The reason it’s called a “tomato psyllid” or “potato psyllid” is because this pest is considered one of the most damaging to these crops.
Though, the adults aren’t the damaging ones; the nymphs are. They’re flat, brown, and have a scale-like texture and look.
They’re usually found underneath foliage, such as underneath leaves and along the stems.
They secrete a white, waxy granule-like substance (often called “psyllid sugar”), which is what most see as the white spots on their tomato plant’s leaves.
What causes tomato psyllid?
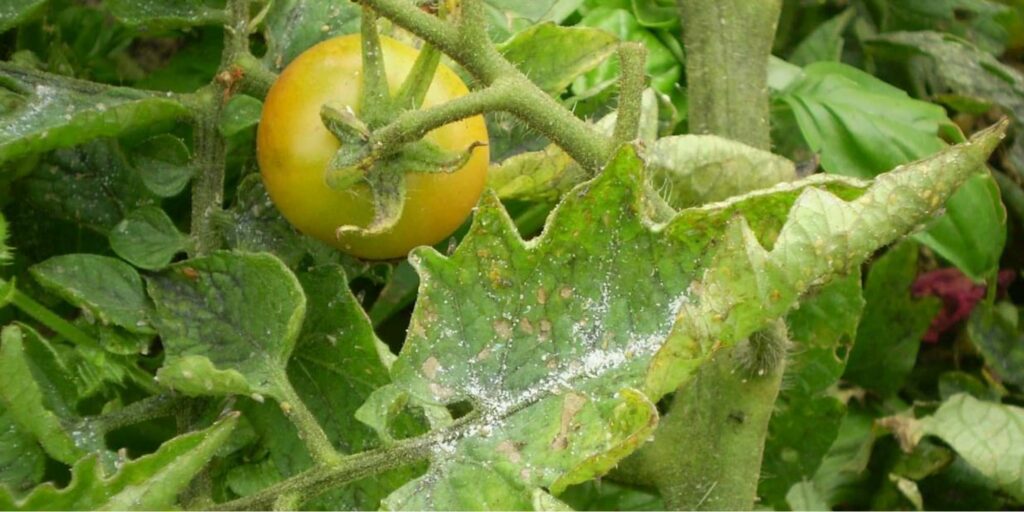
Unfortunately, when outbreaks of tomato psyllids happen it occurs irregularly. So, it’s a tad difficult to determine the exact cause of tomato psyllids entering your garden.
Many believe they get around because of wind travel. Since they’re very small, it doesn’t take much to blow them from one region to the next.
What we do know is that they don’t thrive in cold environments. Hence, if you live in an area that experiences freezing winters then it’s unlikely you’ll encounter tomato psyllids in your home garden.
What are the effects of tomato psyllids?
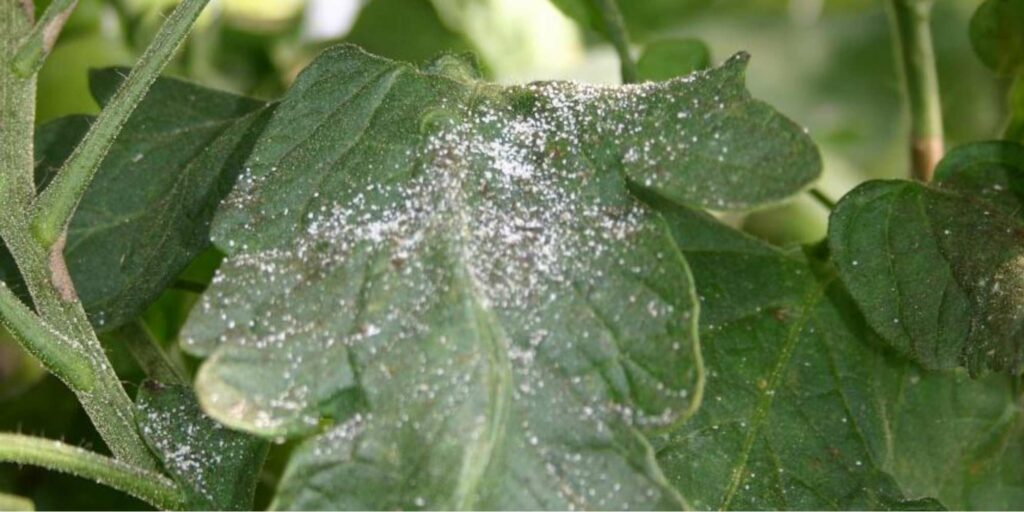
The tomato psyllid has a sharp mouth which makes it easy for these pests to penetrate through your tomato plant’s stem. Through this, they suck the sap out of your tomato plant like a tiny vampire.
While this sounds alarming, that isn’t the worst part. Many nymphs can inject phytotoxin, which is a type of plant poison, into the stem.
Once this happens, you can expect stunted plant growth, which is detrimental to younglings. The overall damage dealt will depend on the amount of toxin released into your plant’s stream.
You’ll notice your leaves curling, warping, and turning yellow. Aside from that, your tomato plant will barely produce any fruit either.
How do I treat tomato psyllid?
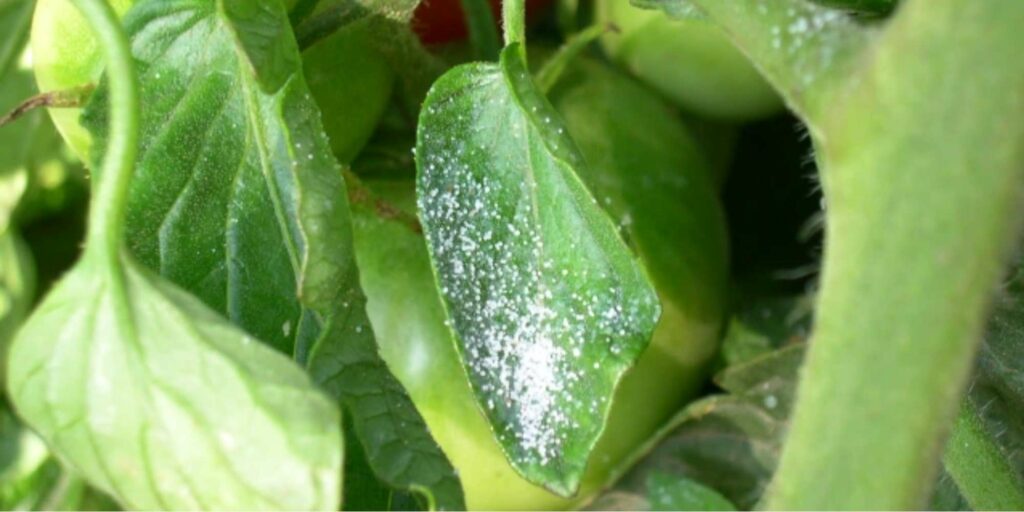
Option #1: Introduce natural predators.
One of the most common ways to get rid of tomato psyllids is to introduce natural predators into your garden. We think this is an effortless hack, too, since these predators will do all the work for you!
Predators of the tomato psyllids include:
- Lady beetles
- Damsel bugs
- Pirate bugs
Another plus to adding these natural predators is they’ll help get rid of other pests in your garden, too, such as thrips.
Option #2: Spray spinosad insecticides.
Spinosad is an insecticide used to control a large variety of pests. These include tomato psyllids, lice, fleas, spider mites, mosquitos, and fruit flies, among many others.
Ensure to read the instructions properly as spinosad comes in different forms. Hence, some may require dilution while others can be used right out the box.
The best time to use spinosad is early in the morning or in the evening when the pests aren’t active. Take your time to ensure that the foliage is evenly coated.
What’ll happen is the pests will feed on the foliage that has spinosad. Once ingested, the toxic components will negatively affect their nervous system.
Don’t worry, though, spinosad isn’t toxic to humans in small quantities.
However, it’s important to keep in mind that spinosad should be used sparingly and carefully. It can also cause harm to beneficial insects such as bees.
Option #3: Spray horticultural oils.
Several kinds of horticultural oils work effectively at controlling tomato psyllids. These include:
- Paraffinic oil
- Neem oil
- Vegetable oil
To use, spray generously on your foliage. Weekly reapplication may be needed depending on the severity of the outbreak.
How do I prevent tomato psyllid?
The best way to prevent tomato psyllids from entering your garden is to spray horticultural oils weekly to keep tomato psyllids from laying eggs on your foliage.
You can spray any of the following horticultural oils:
- Paraffinic oil
- Neem oil
- Vegetable oil
Be sure to distribute an even and generous amount to repel tomato psyllid.
7. Whiteflies
What are whiteflies?
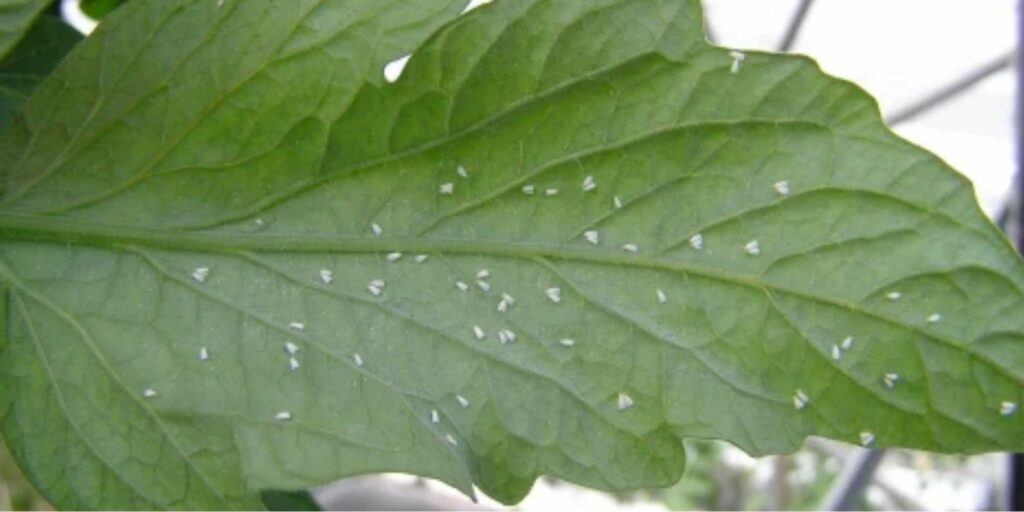
From afar, whiteflies look like tiny speckles on your tomato leaves. However, upon closer inspection, you’ll notice that they’re very much alive.
Aside from sucking the sap out of your tomato plant, adult whiteflies also inject toxins into its system. As a result, this weakens your plant, making it more susceptible to diseases.
Because they’re so small, they’re incredibly difficult to spot unless you’re actively looking for them.
What causes whiteflies?
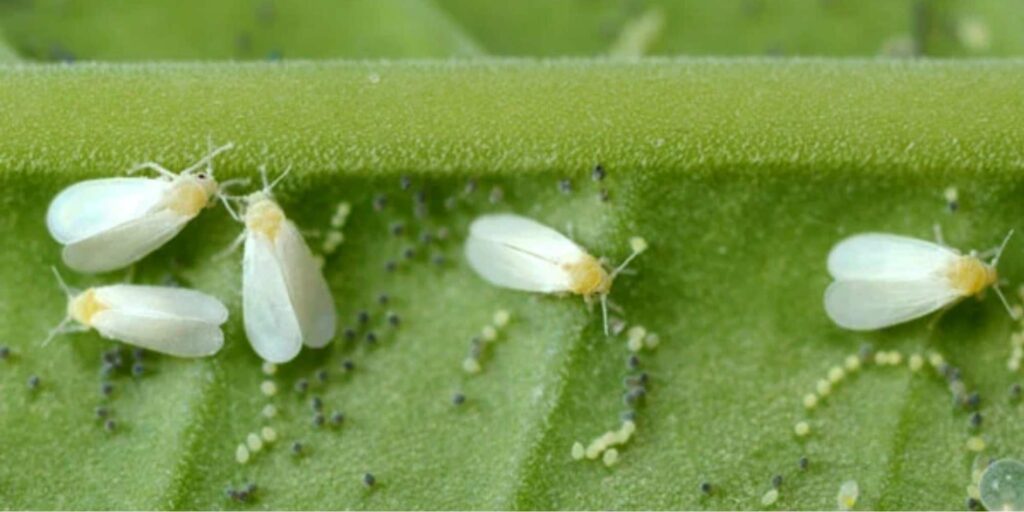
Because whiteflies cannot survive in areas with low temperatures, they typically enter gardens through already infested plants or migration.
Since they don’t solely feed on tomato plant varieties, they can come from a range of other plant hosts such as:
- Peppers
- Squash
- Eggplants
- Broccolis
- Potatoes
They also love warm and humid areas, which help promote rapid population growth.
When this happens, they become increasingly harder to control. This is because even a small number of whiteflies can already create a ton of damage to your crops.
What are the effects of whiteflies?
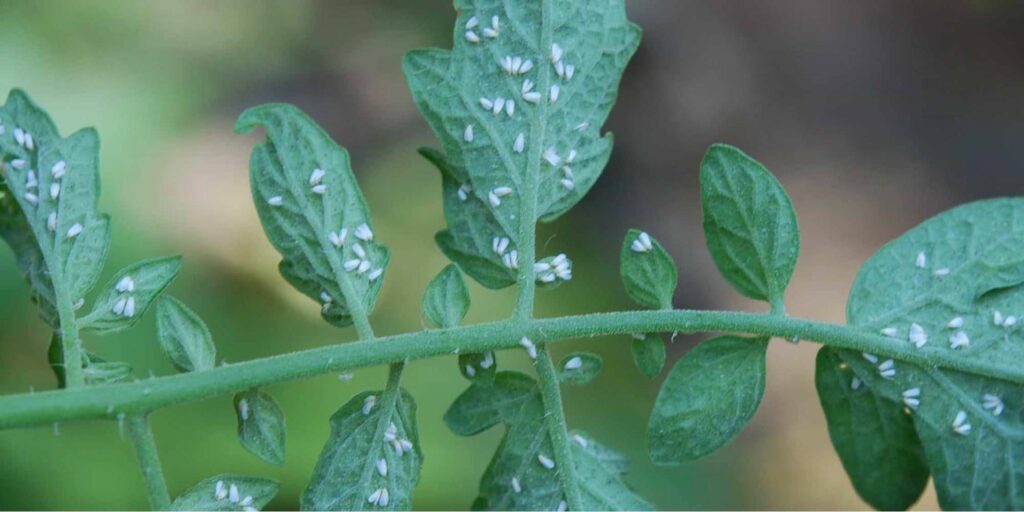
When whiteflies inject toxins into the tomato plant, this causes a variety of ripening disorders and curling of leaves.
You’ll notice your tomatoes displaying the following symptoms:
- Yellowing shoulder
- Blotchy ripening
- Internal browning
When it comes to consuming affected tomatoes, it all boils down to personal preference.
If there aren’t many affected areas or cloudy spots, some gardeners will opt to simply cut out the damaged areas as this doesn’t appear to affect the fruit’s eating quality.
To make things worse, they release honeydew, similar to aphids. These attract ants to your garden, which will serve as protectors of the whiteflies as they ward off its natural predators.
How do I treat whiteflies?
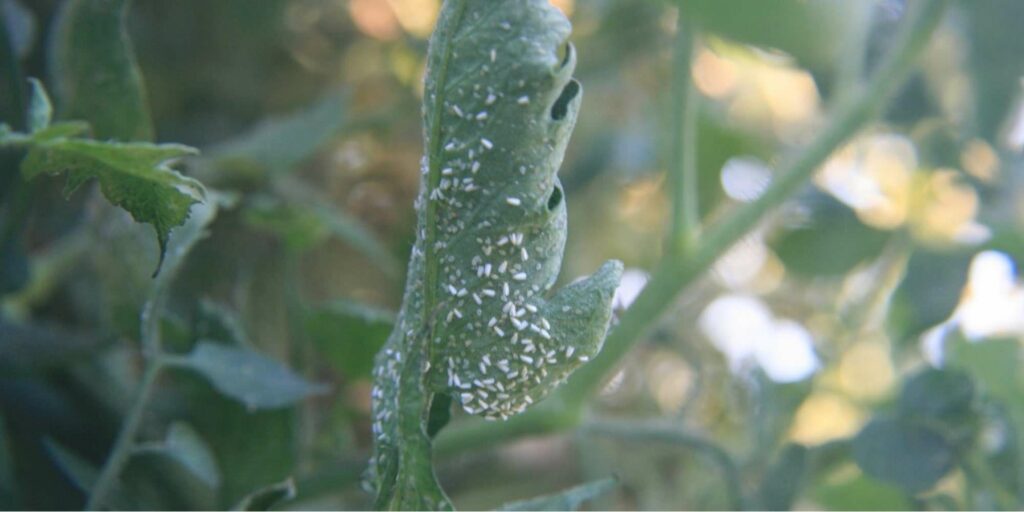
If you have whiteflies in your garden wreaking havoc on your tomato plants, here are a couple solutions you can try:
Option #1: Wash them off with water.
If you’ve caught the infestation early, you can simply wash them off with water from a powerful hose. Ensure that you’ve sprayed even the underside of the leaves as they love to hide underneath foliage.
Option #2: Spray neem oil.
As a natural pesticide, neem oil is a garden staple when it comes to tackling pests and fungal infections. Fortunately, they work just as well when trying to get rid of whiteflies at all developmental stages.
To use, mix 1 gallon of water with 1 teaspoon of concentrated, cold-pressed neem oil. Then directly spray the neem oil onto the foliage.
You don’t have to worry about spraying too much as your tomato plant will love it!
Option #3: Hang up sticky yellow fly traps.
Sticky traps are a great way to catch whiteflies as they hop from one plant to the next. You may want to prop these on sticks facing and away from your plant to catch whiteflies hopping around.
How do I prevent whiteflies?
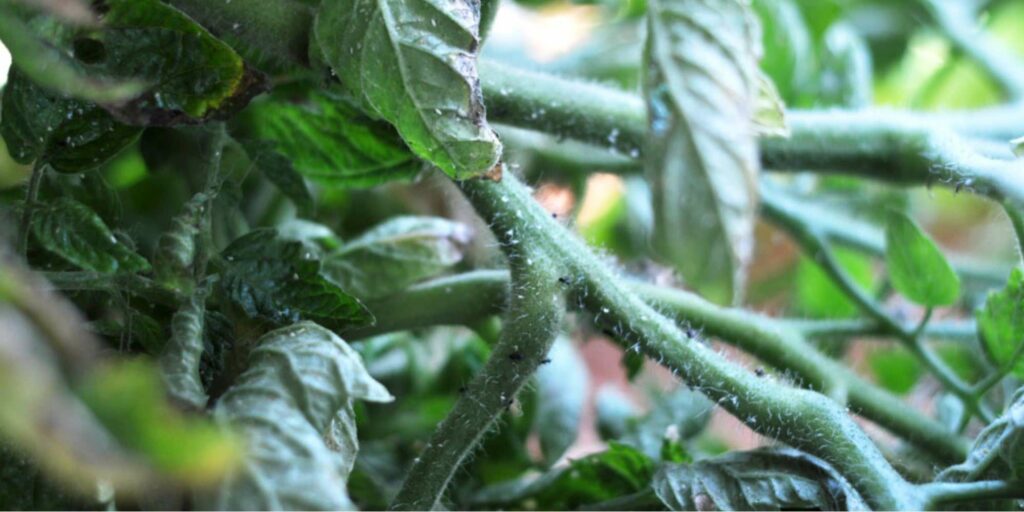
To effectively keep whiteflies away, introduce natural repellents to your garden. These include plants and natural predators that can control the population of whiteflies and other pests.
When it comes to plants, consider bringing in one or more of the following:
- Catnip
- Basil
- Dill
- Chives
- Marigolds
When it comes to natural predators, try to make your garden an appealing environment to:
- Ladybugs
- Lacewings
- Hoverflies
- Ground beetles
- Damsel bugs
8. Stink bugs
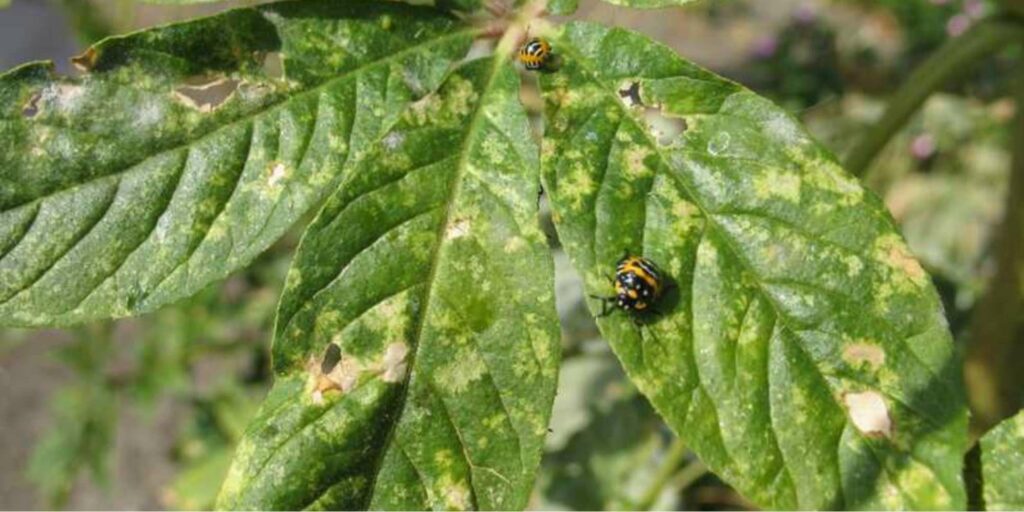
What are stink bugs?
Stink bugs are notorious for, well… their stink. They’re named after their ability to expel a repellent odor when threatened.
Despite having over hundreds of varieties, stink bugs are distinct for their shield-like backs, which make them easily distinguishable among other pests.
They typically grow to about ½ inch long and come in brown, black, or green. Aside from that, they also have red, yellow, or even pink markings on their backs.
While they’re native to Asian regions, they can be found across North America (there are about 200 varieties of stink bugs here) and the UK (there are about 40 varieties of stink bugs here), among others.
What causes stink bugs?
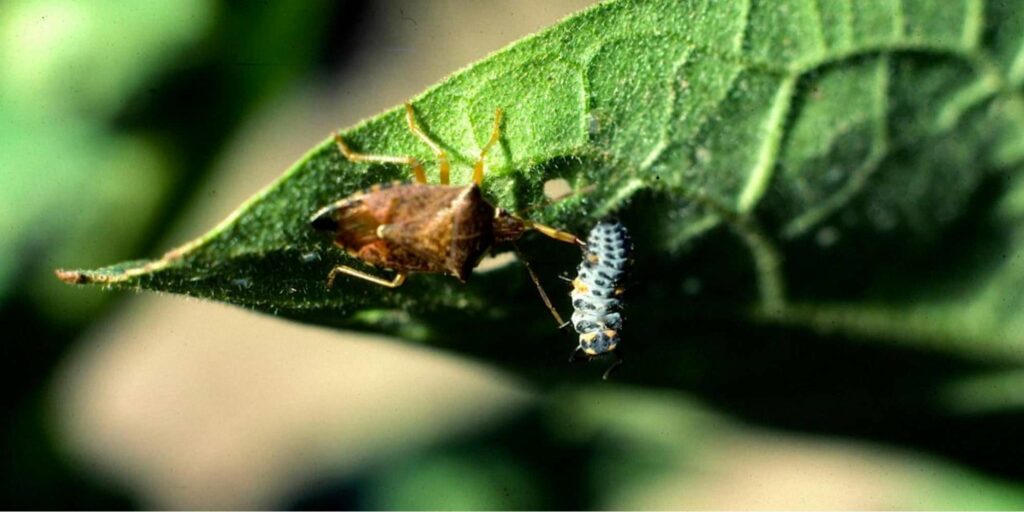
There isn’t really a complete explanation for why stink bugs choose to go to your location. It could be because they’re simply seeking shelter and found your garden to be quite cozy.
Stink bugs love rural environments that are constantly moist and cool. Hence, they’re mostly found in areas such as fields, shrubs, and large gardens.
If they do make themselves comfortable in your garden, it’s important to note that they’ll call on the rest of their kind to follow suit.
They’ll release a pheromone that will tell other nearby stink bugs their location. Unfortunately, that means there’ll be a couple more unwanted guests arriving.
What are the effects of stink bugs?
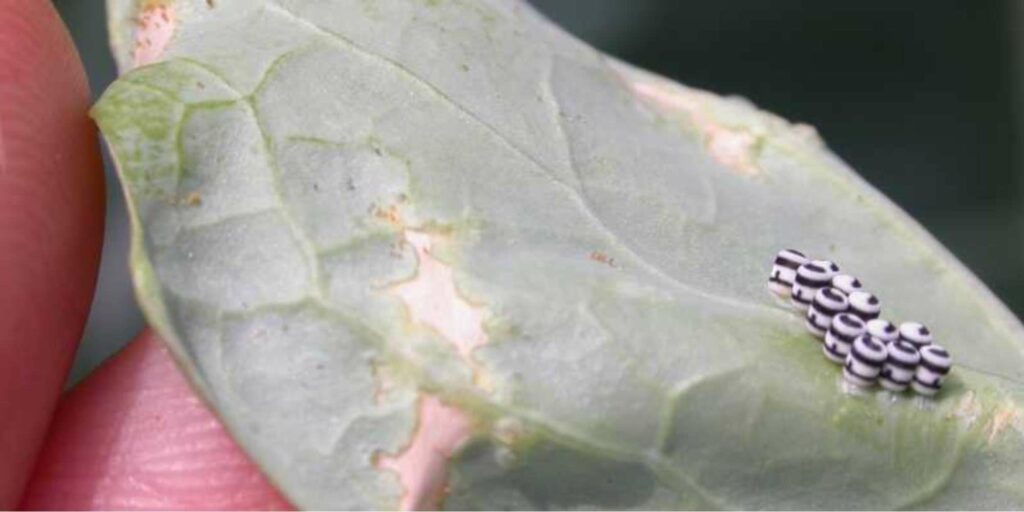
Stink bugs bite foliage, leaving white spots in their wake. Hence, you’ll find quite a few scattered and cloudy-looking holes on your tomato plant’s leaves.
However, they deal more damage to the fruits, which are their main target.
They have sharp mouths that prick the fruit’s skin and release an enzyme that turns the tomato’s insides into liquid, which they feast on.
To make things worse, they’re often carriers of bacterial pathogens. As a result, your tomato plant will be even more susceptible to diseases and fruit decay.
How do I treat stink bugs?
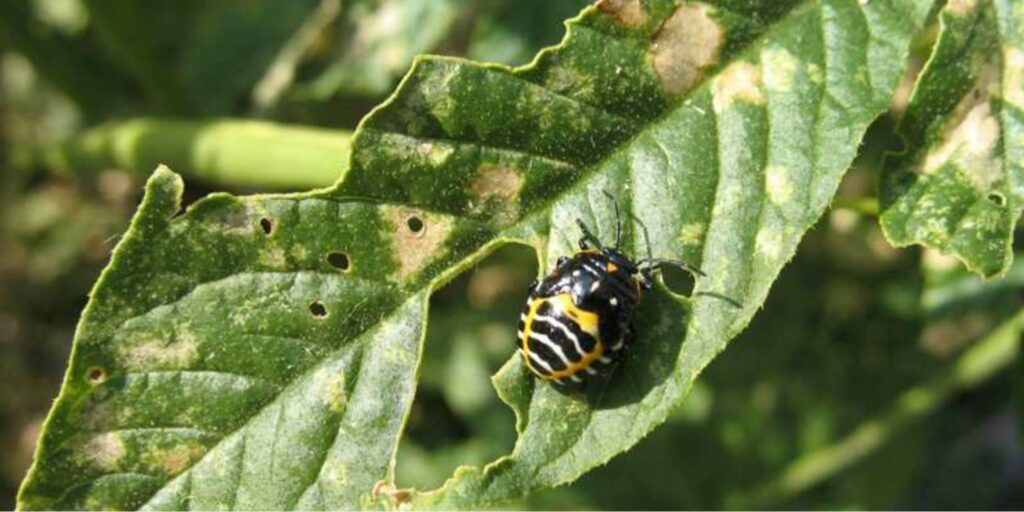
Since they’re fairly large in comparison to other garden pests, you can easily pick them up and dispose of them. Combine soapy water and vinegar and simply drop them into the solution.
If you don’t want to pick them up with your bare hands, use gloves. If that doesn’t make things any easier for you, scoop them up with a water or soda bottle instead.
Afterwards, you can either throw the bugs away or add them to your compost pile.
How do I prevent stink bugs?
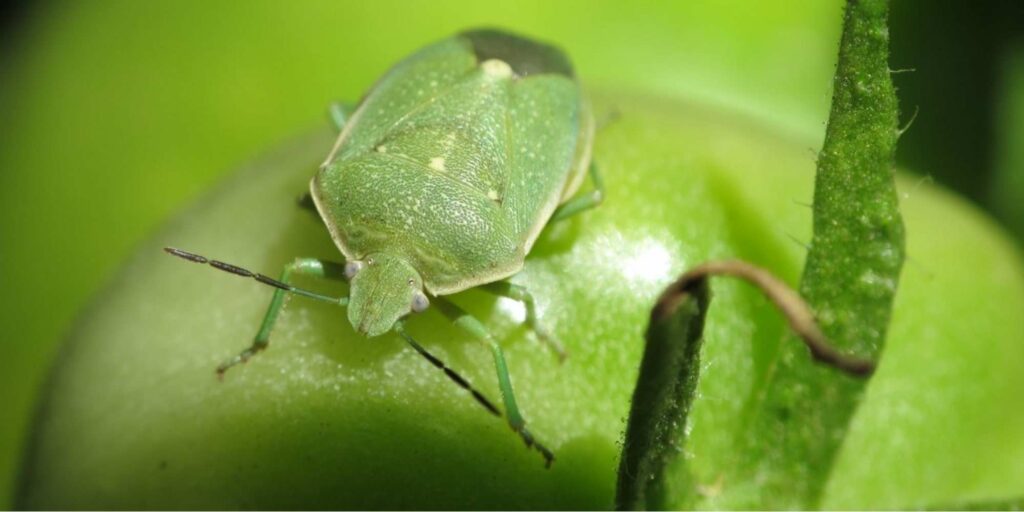
If you’ve recently gotten rid of a stink bug infestation, here are a couple of ways to ensure that they don’t come back:
Seal up your garden and home.
If you have an open garden, you may want to install nets to protect your plants from becoming tasty treats to critters like stink bugs.
As for your home, check for any cracks or holes where bugs are most likely to get in through. Check the caulking and sealants, too.
Introduce natural predators.
To make the job easier for you, introduce natural predators that will kill stink bugs. Spiders and birds are just a few examples of their natural enemies.
Spray neem oil.
As a natural pesticide, neem oil is great at ensuring that there aren’t any leftover nymphs that can grow on your property. However, this doesn’t repel adult stink bugs so you’ll have to deal with them manually.
9. Frostbite
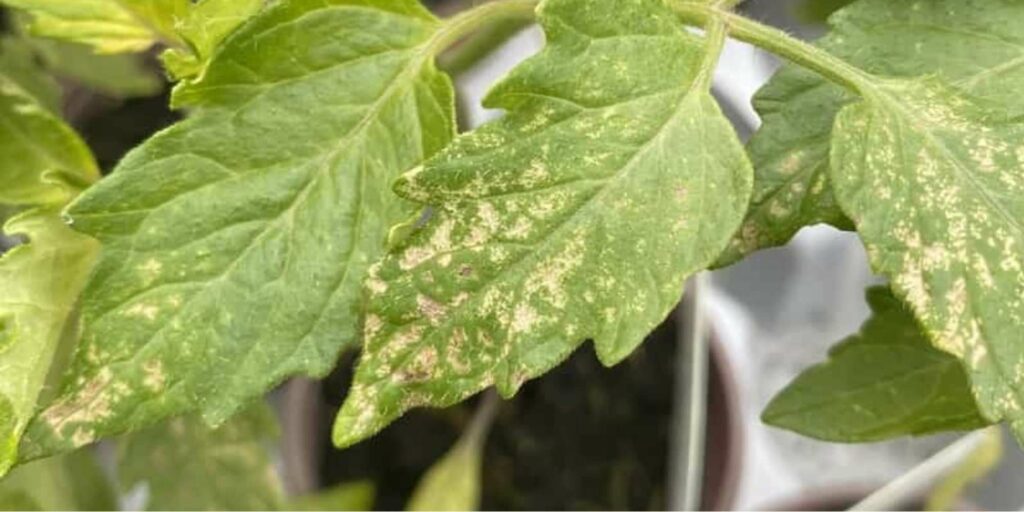
What is frostbite?
Similar to human frostbite, frost damage in tomato plants happens when your plant is subjected to freezing temperatures.
As heat-loving plants, tomato plants often don’t fare well in colder climates despite being quite resilient. When it comes to their sweet spot, they like weather somewhere between 55 and 85 degrees Fahrenheit.
What causes frostbite?
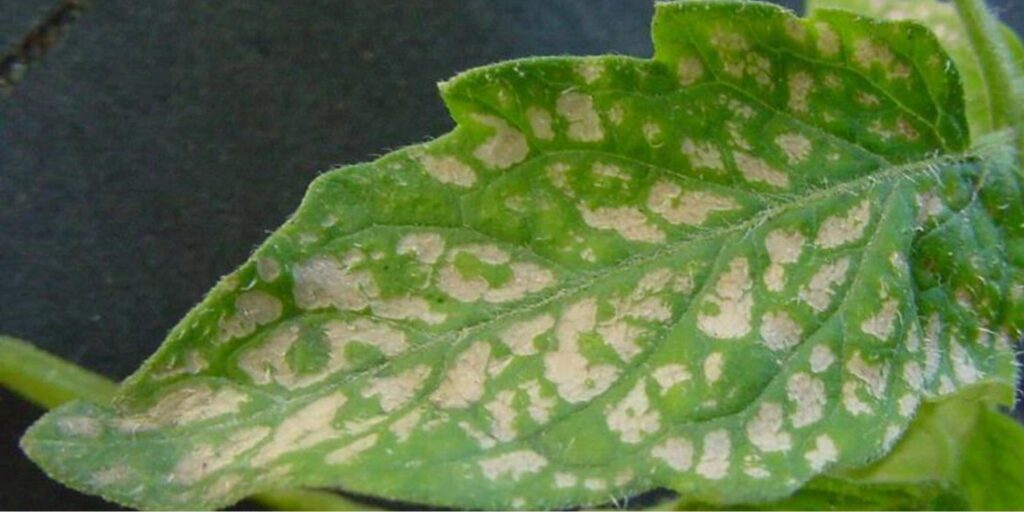
Frostbite is caused by extremely cold temperatures. You can expect your tomato plants to begin showing signs of declining health once temperatures reach 13°C or 55°F or drop even further, especially during the winter months.
When temperatures don’t seem to be rising, it’s best to keep your greenhouse warm or take your plant indoors.
What are the effects of frostbite?
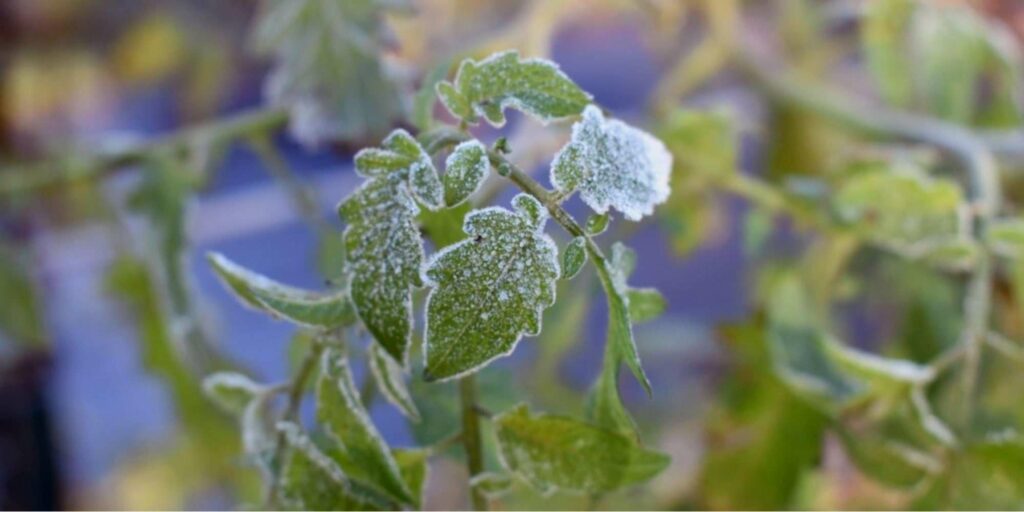
As magical as snow looks on plants, frost damage doesn’t look pretty when it’s causing your tomato plants to suffer. The effects include
- White or brown spots on the foliage
- Wilted and soggy foliage
- Lesser and poorer fruit production
- Stunted growth
- Poor root development
One of the effects of frostbite are white spots on the foliage of your tomato plant. They’ll also begin to wilt and become soggy, which can affect the stem or leaf’s tissues.
You can also expect the leaves of newly transplanted tomato plants to turn yellow on top and a tad purple on the underside. Meanwhile, more established plants’ foliage will turn black.
You’ll also see lesser and poorer fruit production the colder the temperature gets. This is because your fruit can’t grow properly under these conditions, resulting in scarring and malformation.
Having said that, don’t expect your tomato plant to show signs of proper growth either. This can be attributed to poor root development from the chilling temperatures.
How do I treat frostbite?
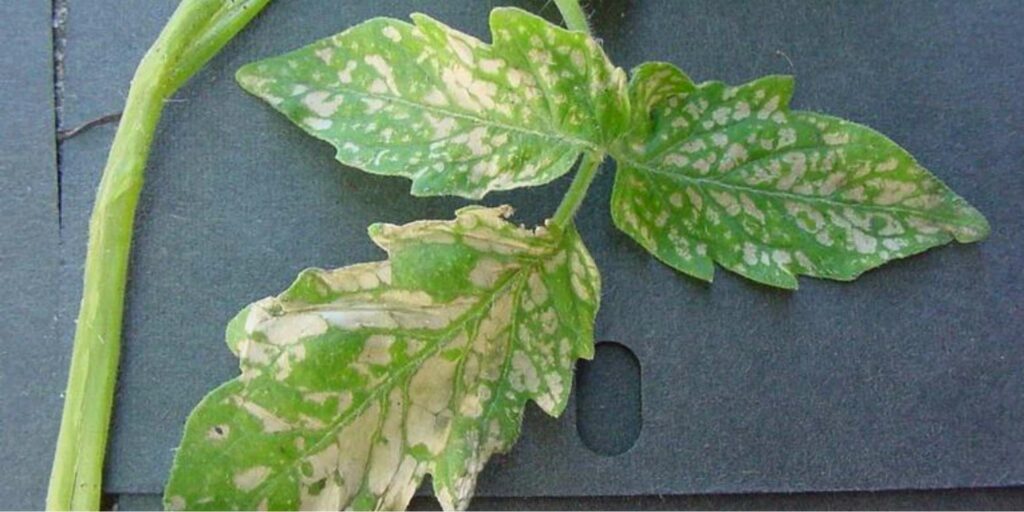
If your tomato plant has frostbite, the only way to get rid of it is to warm up your plant. You can do so by bringing it inside and wrapping it in old thick blankets, towels, and the like.
More often than not, foliage that has survived will have some whitened leaves but will return to green eventually. On the other hand, foliage that has turned black will eventually fall off once the entire plant has thawed.
How do I prevent frostbite?
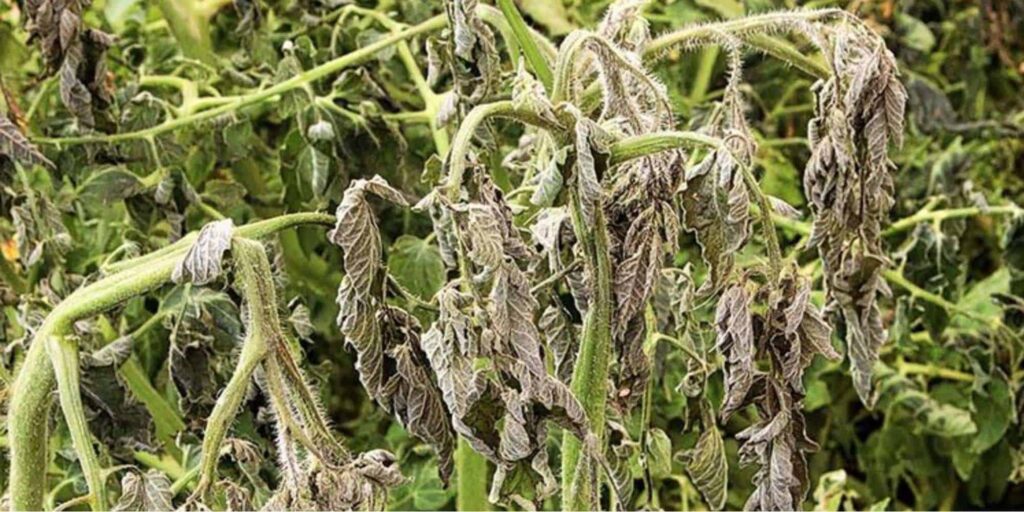
The best way to prevent frost damage is to ensure that your plants are kept warm, especially young plants as they’re most vulnerable.
If the colder months are approaching, don’t prune your plants any more. Instead, wait until after so as not to affect the new foliage growth.
You can loosely drape over some old blankets, towels, cardboard, mulch, and so on.
If possible, bring the plants that you don’t think would be able to survive the cold temperatures indoors.
10. Tomato Leaf Mold
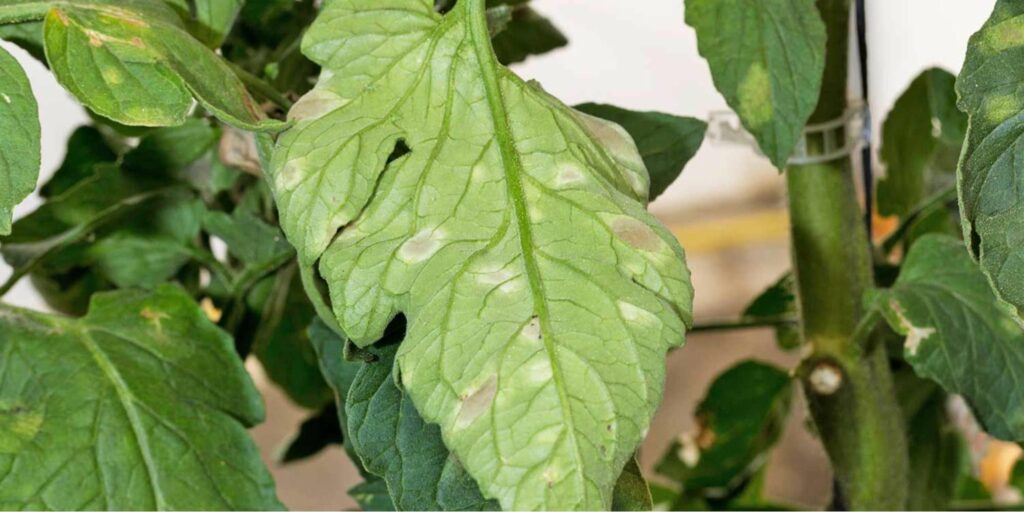
What is tomato leaf mold?
As its name suggests, tomato leaf mold is a type of fungal disease caused by the fungal pathogen Passalora fulva.
This fungus thrives in conditions that are constantly moist and humid, which is why it’s most commonly found in greenhouses.
To make things worse, they don’t just affect tomatoes but virtually all kinds of plants worldwide.
Hence, if you’ve noticed that your tomato plant has leaf mold, it’s best that you act quickly to prevent further damage.
What causes tomato leaf mold?
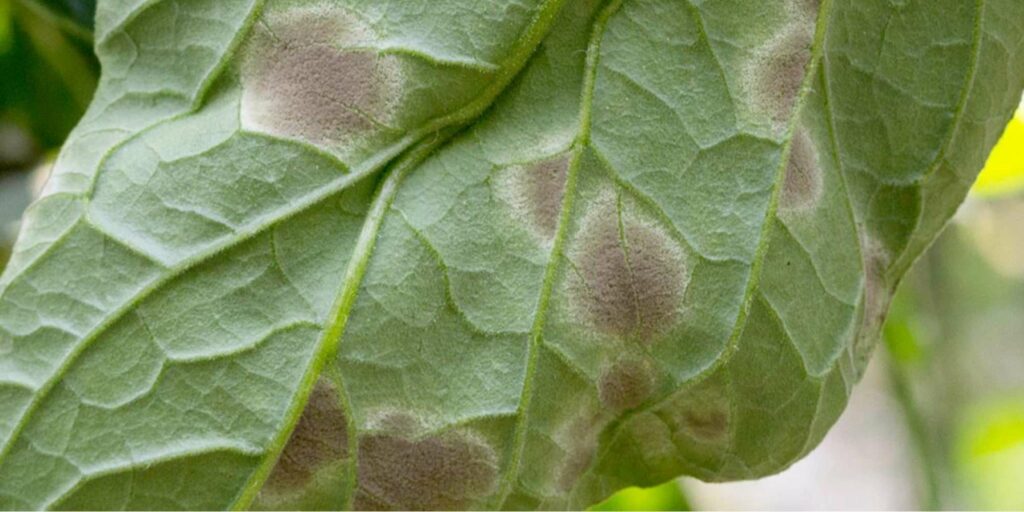
Tomato leaf mold develops when the plant’s environment is just right to help the fungal pathogen grow.
It thrives in areas that are often wet with humidity levels of above 85% as this triggers the germination process.
The pathogen typically spreads through the wind or water, which makes it very difficult to prevent. Hence, the best course of action is sustainable prevention practices.
What are the effects of tomato leaf mold?
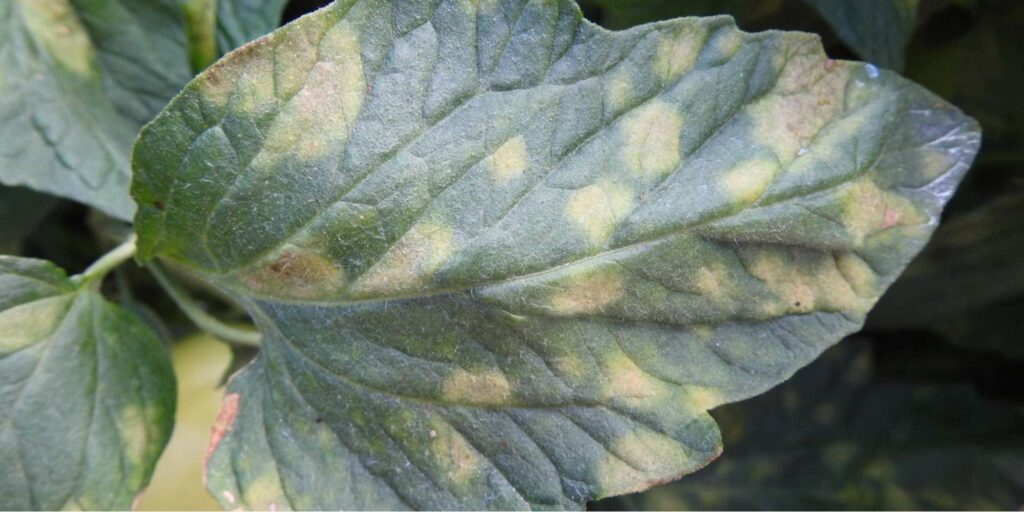
You’ll first begin to see the foliage of your tomato plant developing blotches that are white-yellow . As the infection spreads, these spots will begin turning brown.
Another observable feature would be curling and wilting of infected leaves. After some time, they will simply fall off.
While the fungus primarily affects just the foliage, they sometimes go after the fruits, too. Tomatoes will be a darker color than normal and will begin to rot starting from the stem.
How do I treat tomato leaf mold?
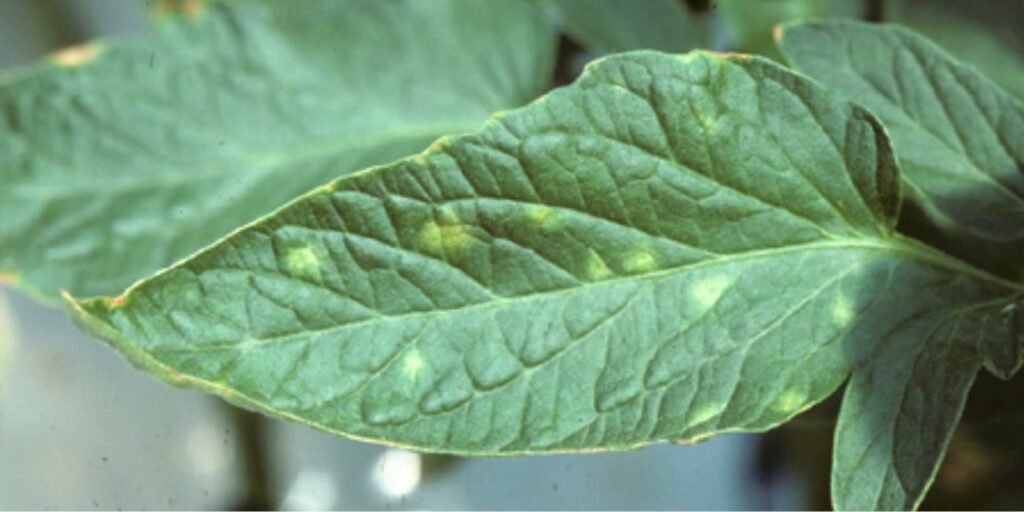
Immediate action is needed to ensure that your plant’s foliage isn’t compromised. Hence, early detection and intervention is crucial.
First things first, prune the infected leaves. Since the fungal pathogen can survive on dead plants, it’s important to burn the debris to reduce the risk of further infection.
Then, you can spray any kind of readily available fungicide in the market that include the following ingredients:
- Mancozeb
- Mandipropamid + difenoconazole
- Cymoxanil + famoxadone
Be sure to spray a generous amount everywhere, especially on the underside of the leaves.
Move your tomato plant to a more well-ventilated area with low humidity levels, which is less favorable to the growth of the pathogen.
How do I prevent tomato leaf mold?
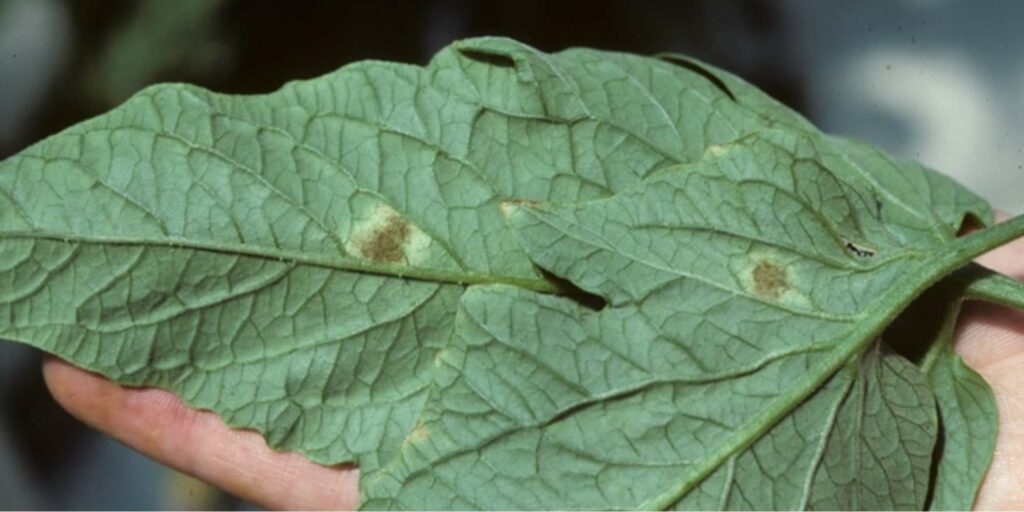
Here are a couple of ways you can prevent tomato leaf mold from entering your garden:
Purchase seeds from a reputable seller.
Buying seeds from sellers that aren’t strict about hygienic practices is a big no-no. This is because infected seeds can bring a ton of other bacteria and fungal pathogens into your garden.
Completely destroy plants post-harvest.
Once you’re done collecting the fruits and vegetables, ensure that you’re properly disposing of the crop’s debris.
This is because some bacteria and fungal pathogens can survive on dead plants for years. Eventually, it can even make its way back into your garden.
Sanitize your garden and equipment.
Your plant, soil, or equipment could be carrying bacteria or fungal pathogens without your knowledge.
With that said, it’s important to regularly sanitize your garden and equipment between uses. This includes sanitizing trellises and floors as well as properly disposing of debris.
Increase ventilation.
Since fungi thrive in humid environments, it’s important to increase ventilation and air circulation.
If you have a greenhouse, you can install fans to lessen the wetness and moisture retention inside.
You can also opt for an irrigation system instead of regular watering to avoid constant wetness. Otherwise, practice only watering the soil and keeping the leaves wet when watering with a hose.
That ends our comprehensive guide on the kinds of white spots that grow on tomato plants and how to treat them!
We’re interested to know if you have any tips or tricks up your sleeve to getting rid of these pesky spots. Let us know your secret by dropping a message!
FAQs on white spots on tomato leaves
Researchers say that you can opt to cut out the infected parts and eat the rest of the fruit. You can even eat it fresh or can it.
The most common cause for white spots on tomato leaves are fungi that thrive in environments that have high humidity levels and are constantly wet.
Hence, ensure that your garden is well-ventilated and that you water your plants early in the morning. Check up on your garden before nightfall to see whether the leaves are still moist from watering.
One of the most effective organic treatments for tomato plants is copper fungicide. You can use this for powdery mildew, black spots, peach leaf curl, and other diseases.
However, copper fungicides are known to be harmful to bees. So avoid using it when bees are active in your area.
Apart from that, using horticultural oils such as neem oil is also a commonly used organic treatment. You can use this directly on the foliage of your tomato plants to deter pests.
If the tomato appears to be unscathed despite the plant itself being infected, it’s generally safe to eat. However, wash it well with soapy water to be extra cautious.
Fungal pathogens can come from anywhere as they can easily be transported through the air, water, or infected plants without your knowledge.
In fact, they can even remain dormant in dead plants for about 2 to 3 years. Hence, you can’t really blame yourself if they suddenly make an unwelcome appearance in your garden.
They’ll begin to grow when the environmental setting is right. This means that humidity levels have to be above 85% and the area has to be typically moist or wet with poor ventilation.
Yes, tomato plant diseases can spread to the other plants in your garden and vice-versa. Having said that, one way to combat this is to increase air circulation and space between your plants.


